.png)
INSTRUCTIONS FOR TRIAL:
We hope that this trial helps you get a better understanding of our software and how it has been used to improve the efficiency and quality of many projects around the world.
You should have received access to a Trial dRofus project, i.e., a Welcome Email which includes a link to download the software, the database name, plus your username and password.
If you do not have these details, please email us at: support@drofus.com
As a guide, the tasks outlined below should take approx. 1-2 hours to complete:
Step 1 - Here + dRofus App Download + Unpack the Trial files / Install + Log in to dRofus App
Step 2 - dRofus App Import Rooms from Excel into dRofus
Step 3 - dRofus + Revit Addon Synchronize dRofus Rooms with Revit Rooms
Step 4 - dRofus + Revit Addon Place a Revit Room, Link to a dRofus Room and Export
Step 5 - Revit Addon Link dRofus Item Type to Revit Family Type
Step 6 - dRofus + Revit Addon Update Occurrences of Items from Revit Model
Step 7 - dRofus App Edit Room Template and Report
Step 8 - dRofus Web + App Edit Item and Report
Upon successful completion of each step, you will have a dRofus database that has been rapidly populated with information, is linked to a design model and can produce a series of reports.
But that is just the tip of the iceberg!
To arrange a demo and discuss how dRofus can benefit your organisation, click here - https://www.drofus.com/contact
STEPS TO FOLLOW:
-
Download + Unpack the Trial files / Install + Log in to dRofus App
a. Download location: Trial_Files-Revit.zip
b. Based on your Welcome Email - download http://www.drofus.no/en/download/, install then run dRofus App
c. Type in your username, password, database and server details, then log in
-
Import Rooms from Excel into dRofus
a. Import Rooms using the file “Step2_Accommodation-Schedule.xlsx”:
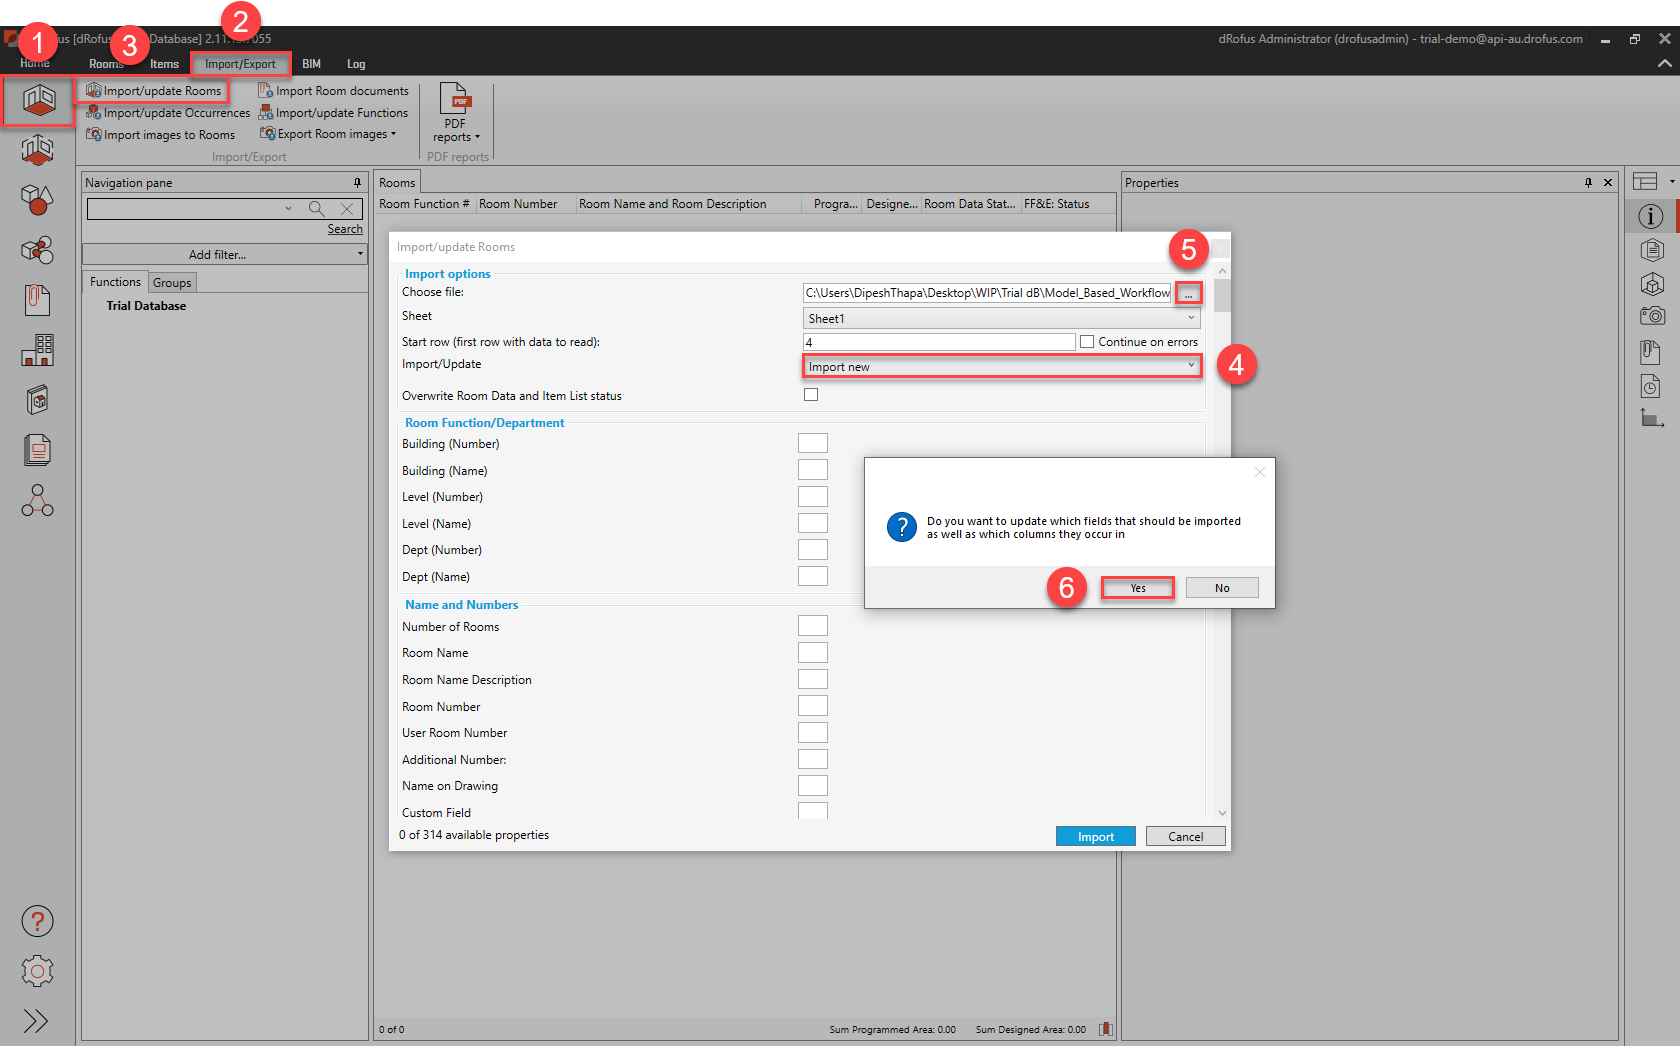
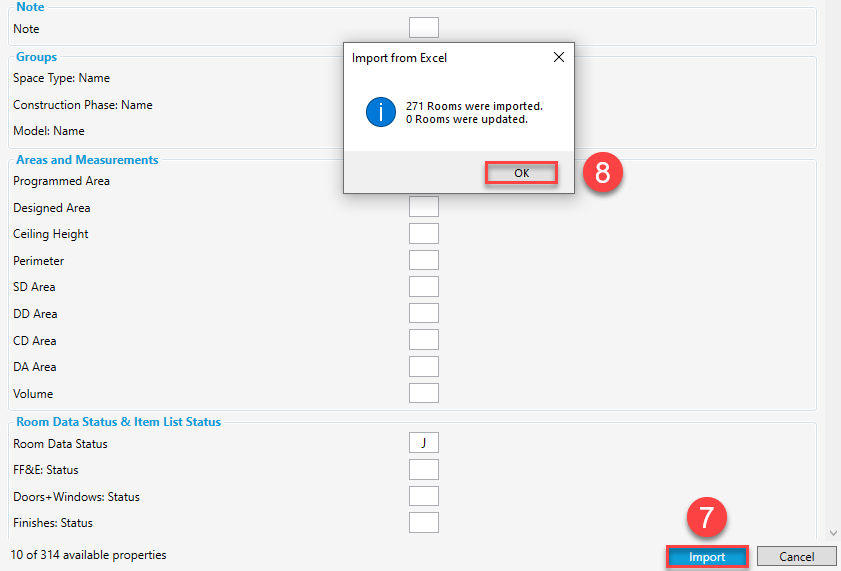
Ensure that the following highlighted selections (in green) are made, especially “Import new” as the Import/Update option:
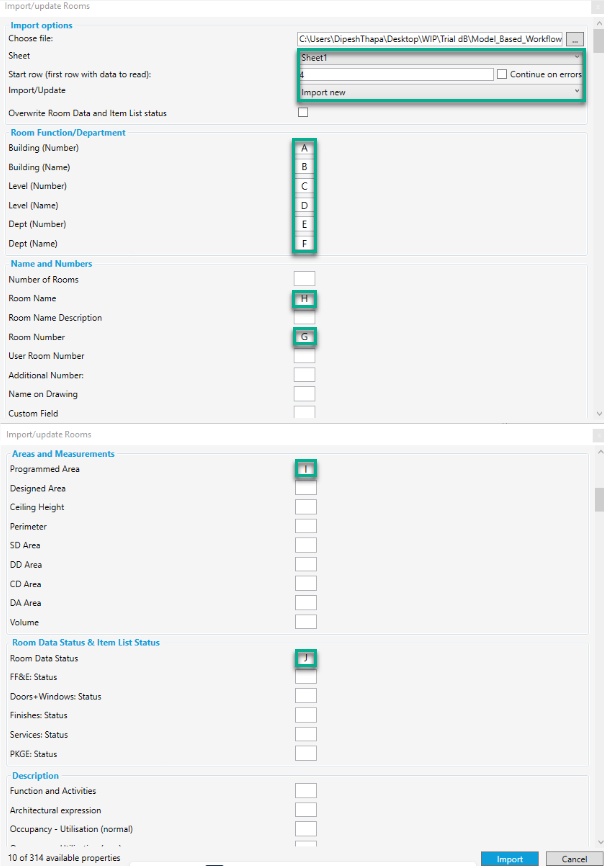
Note: while this auto-mapping has occurred because the column header names within the Excel matches their corresponding fields in dRofus, it is also possible to manually enter the column header letters (A, B, C etc.) above prior to the Import.
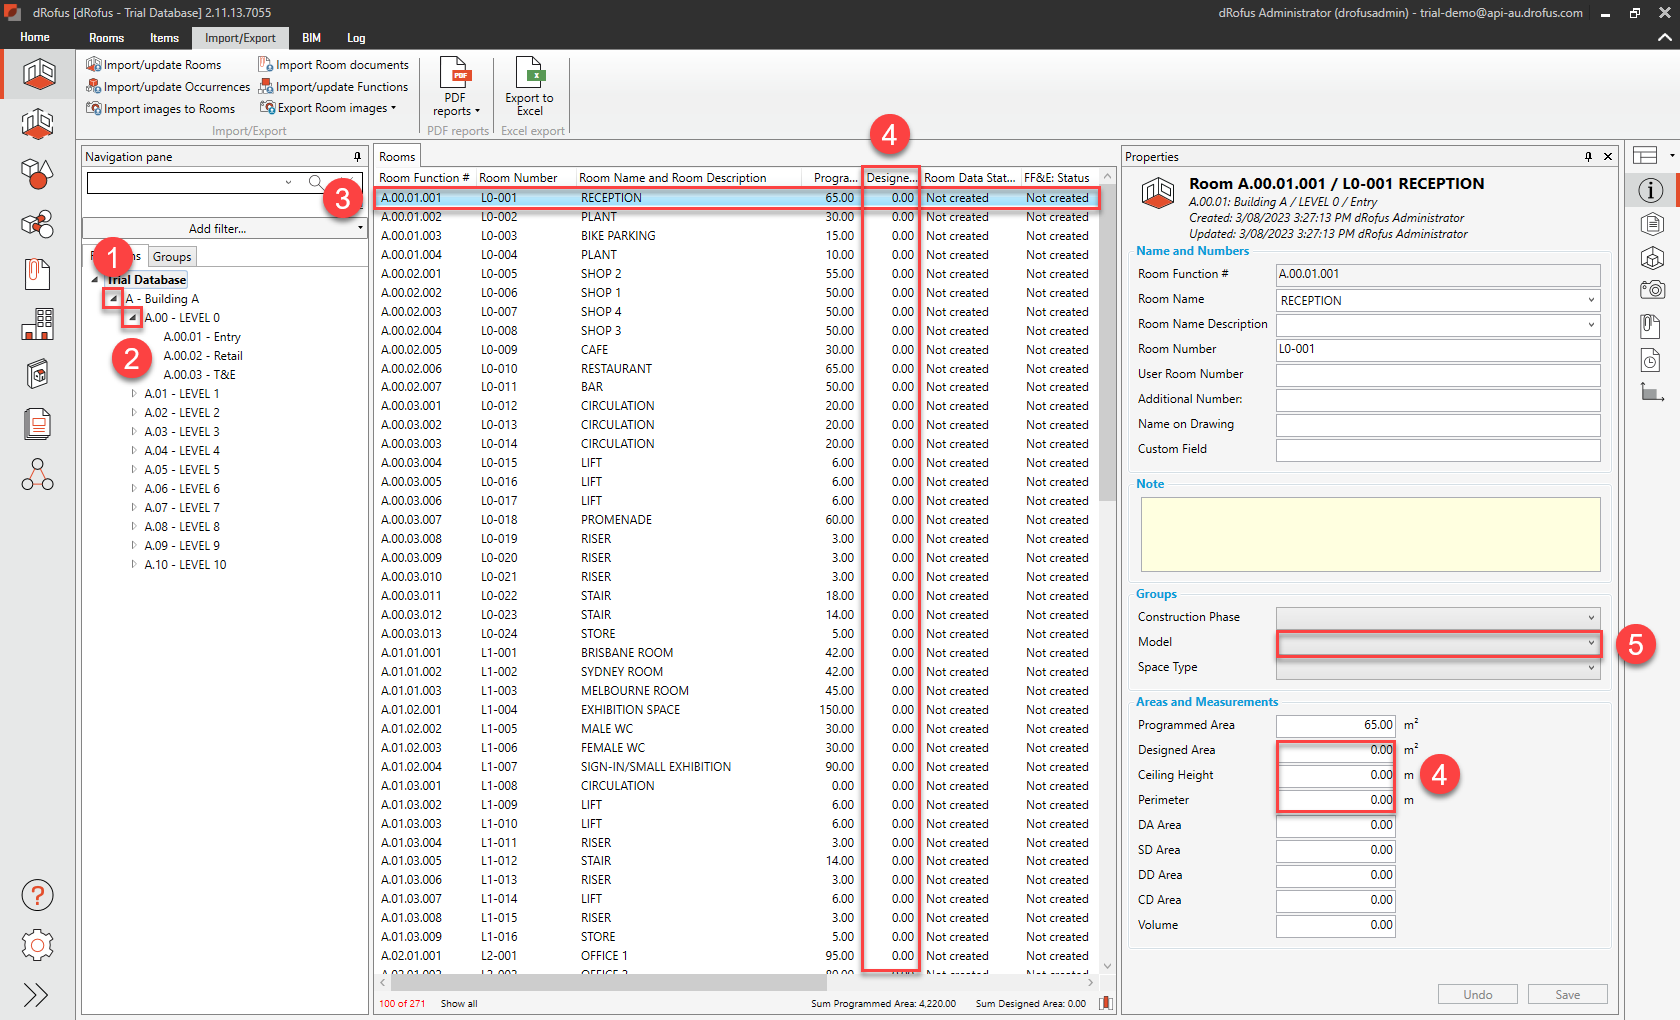
b. Expand / browse the Room Function Structure. Also, take note that currently, none of the Rooms have any values against information that is typically expected to come from the Revit model (i.e., “Designed Area”, “Ceiling Height”, “Perimeter” and “Model”):
-
Synchronize dRofus Rooms with Revit Rooms
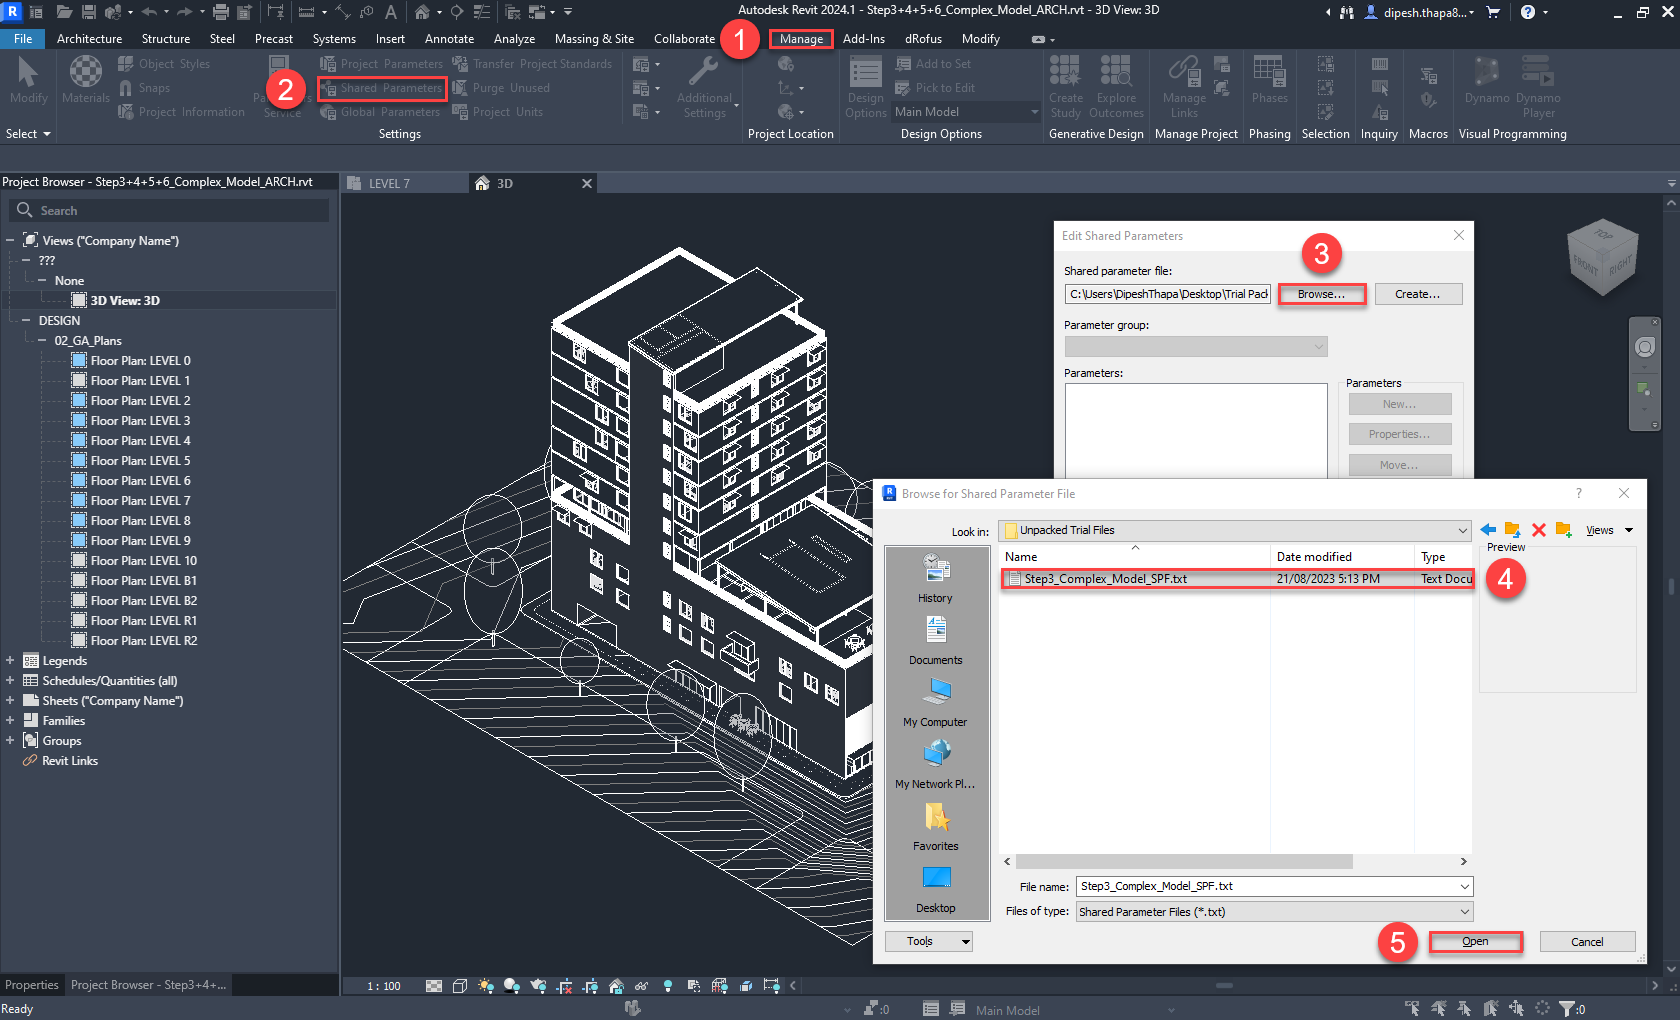
a. Open Revit model “Step3+4+5+6_Complex_Model_ARCH.rvt” (in Revit version 2023 or later), then map the provided Shared Parameter File:
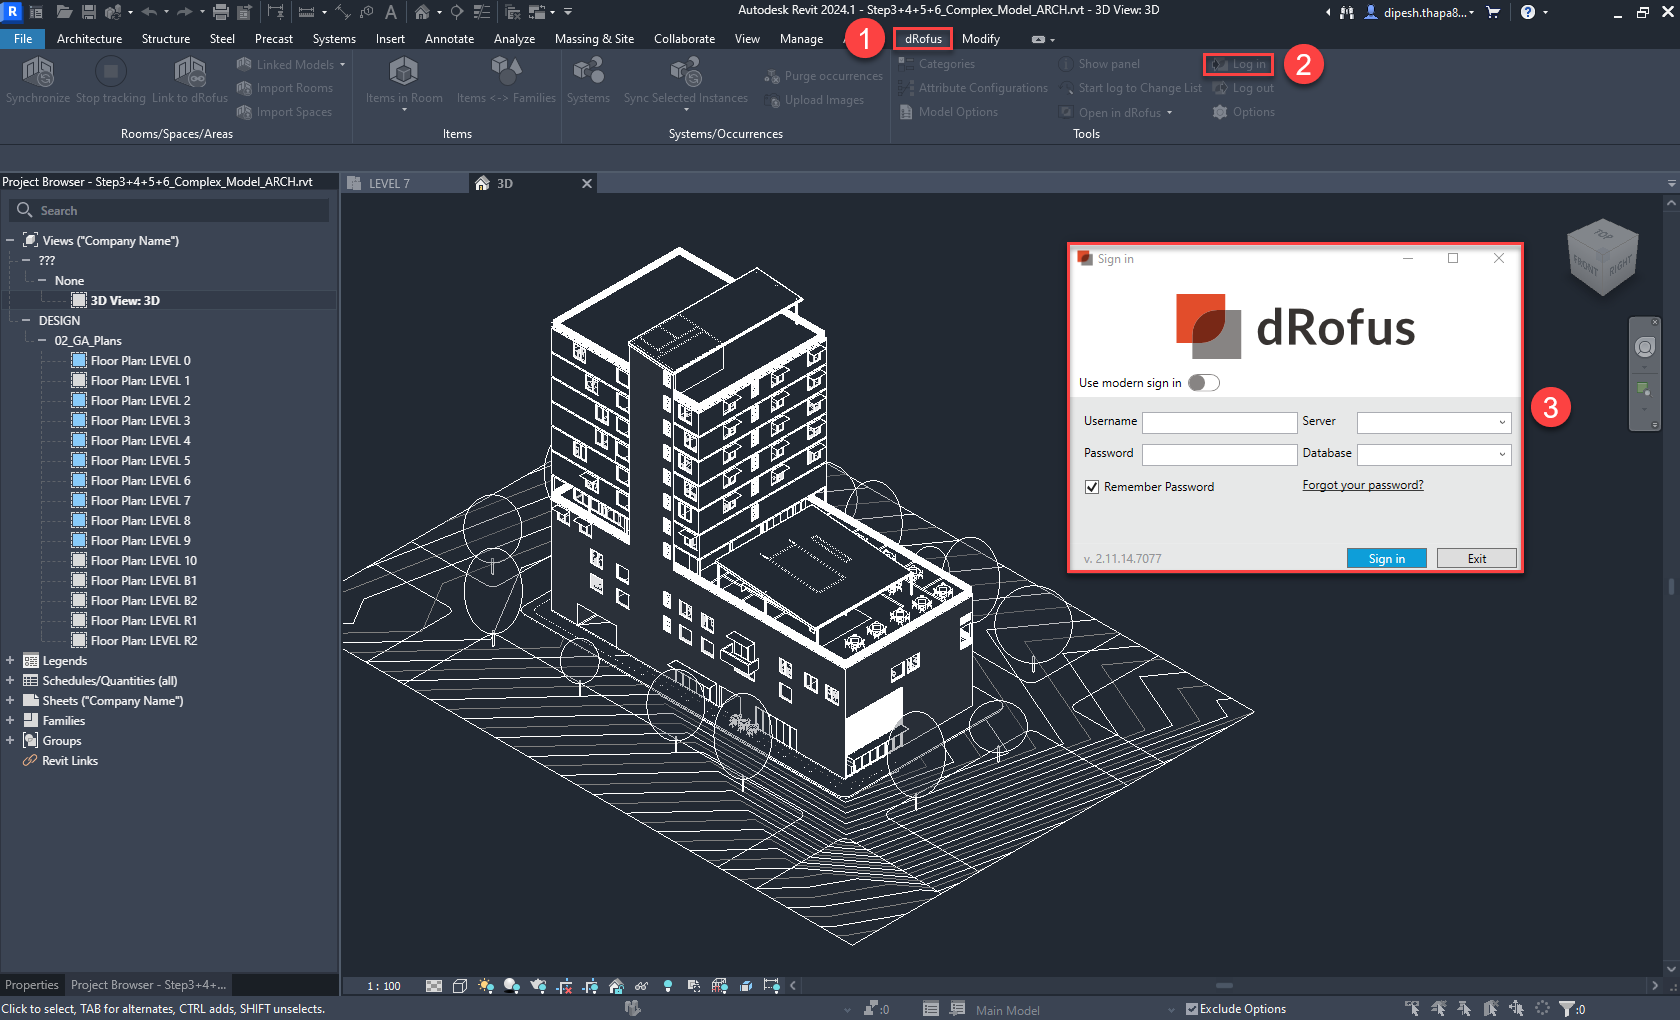
b. Go to the dRofus Ribbon and login:
c. Within Revit’s Project Browser, go to “Floor Plan: LEVEL 7”
d. Synchronise Rooms (ensuring that the highlighted selections in green are made):

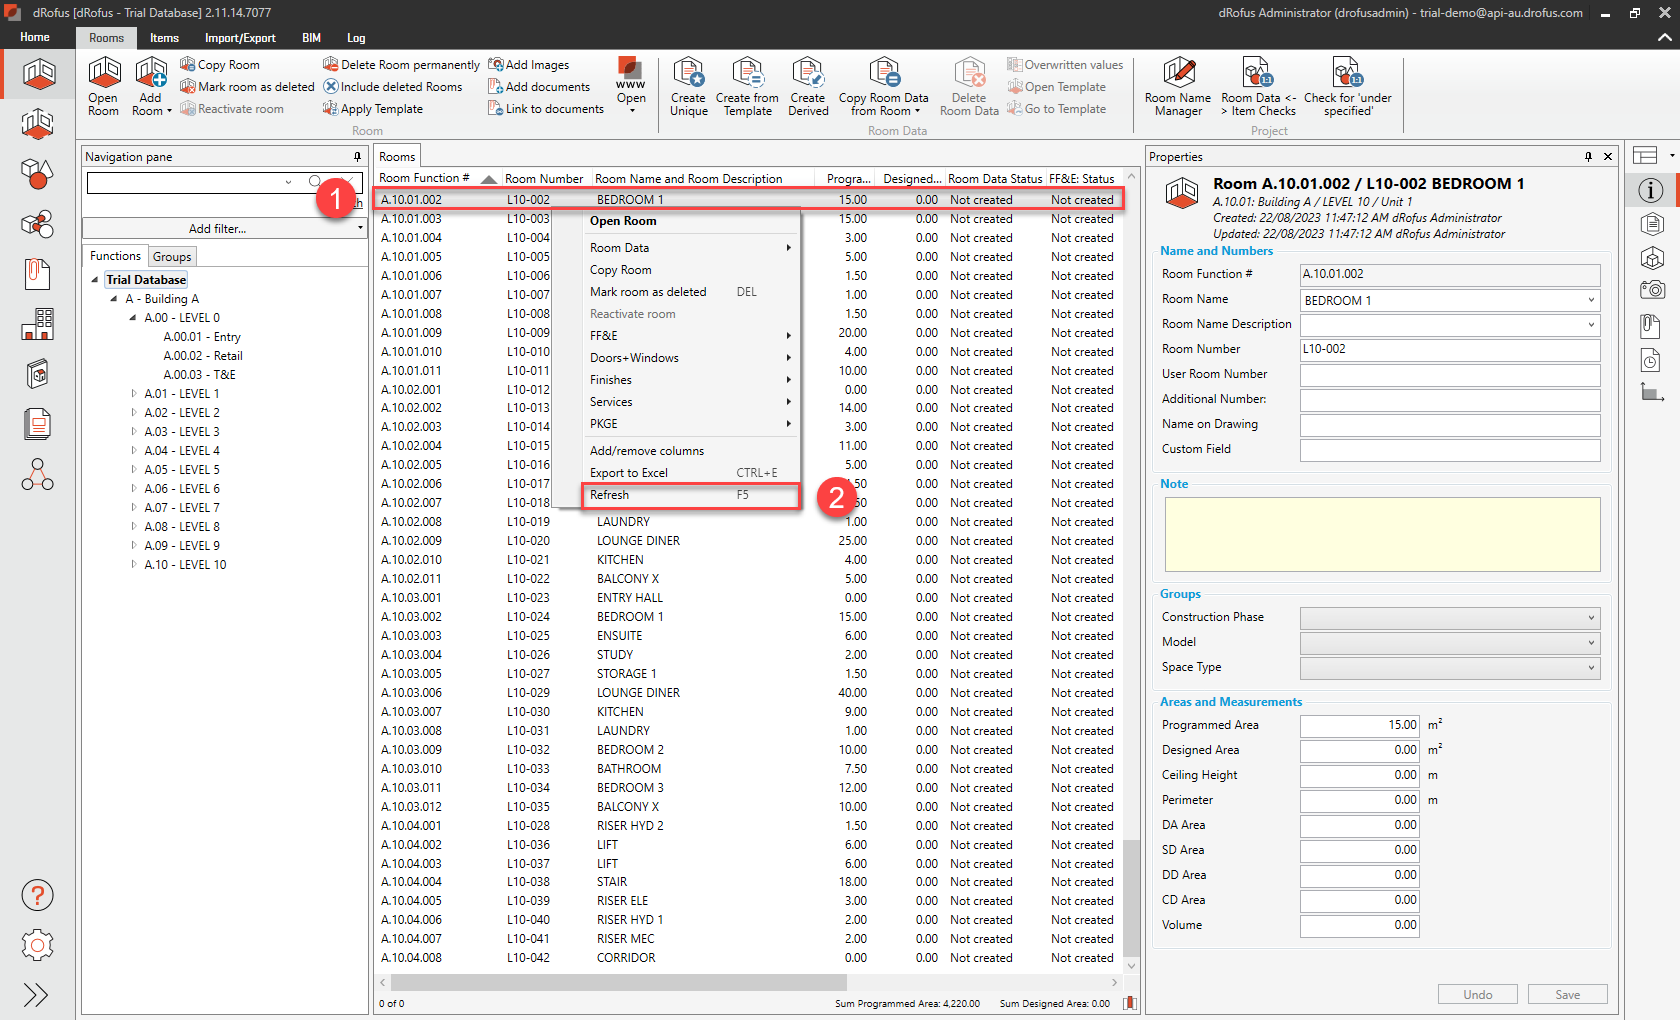
e. In dRofus, right-click on any Room and then click on Refresh:
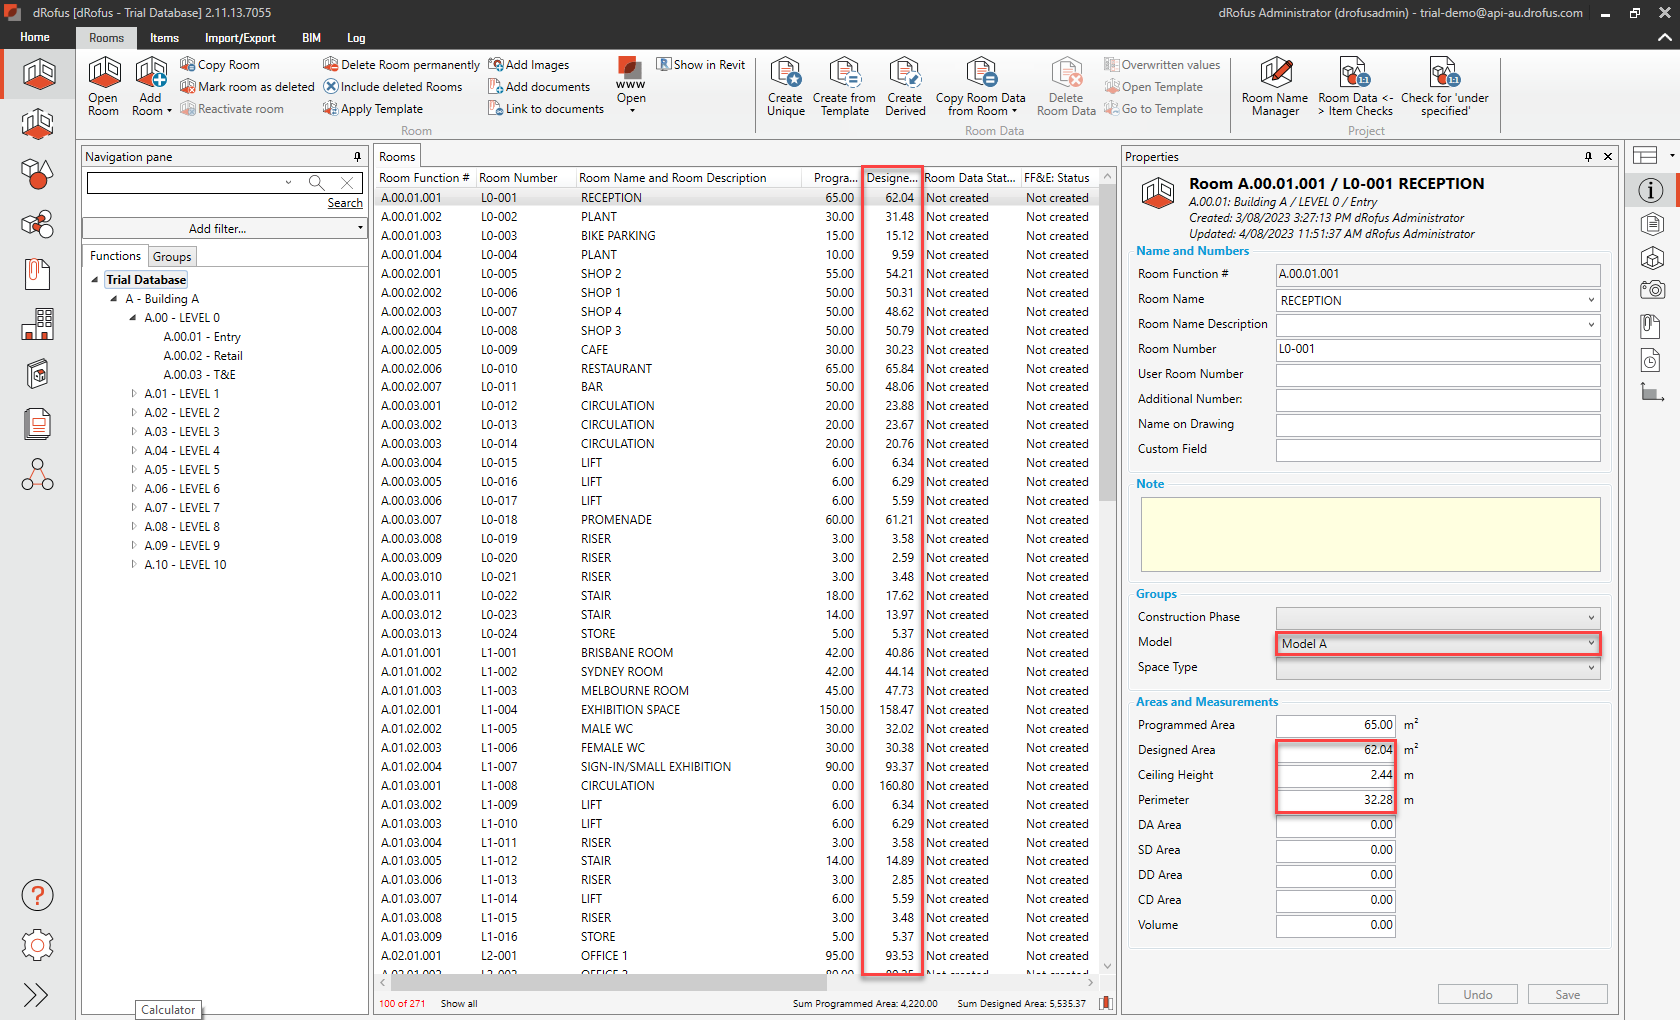
f. Note that the Rooms now have values against the fields where data was expected, the information of which was expected to come from the Revit model (i.e., “Designed Area”, “Ceiling Height”, “Perimeter” and “Model”):
-
Place a Revit Room, Link to a dRofus Room and Export
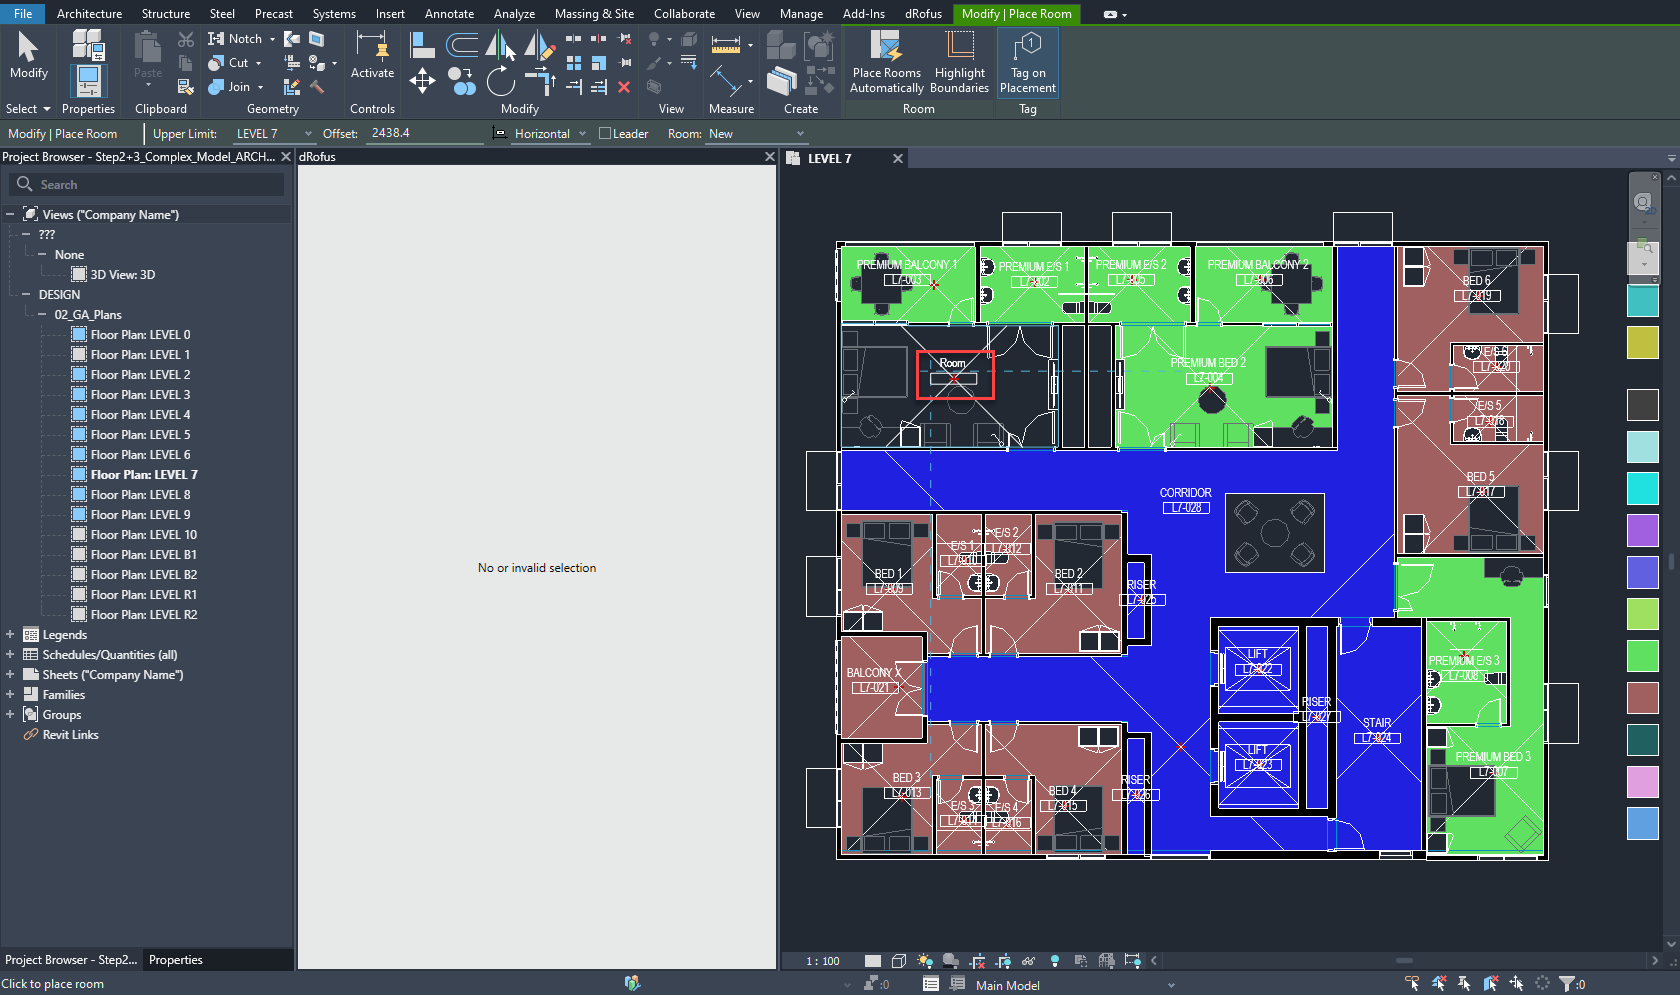
a. Click on “Show Panel” to activate the dRofus Panel (which should then display as “Hide panel”), and ensure Tracking is switched on (i.e., it should display as “Stop tracking”):

b. Select Rooms in Revit, and then place a Revit Room at the following location:
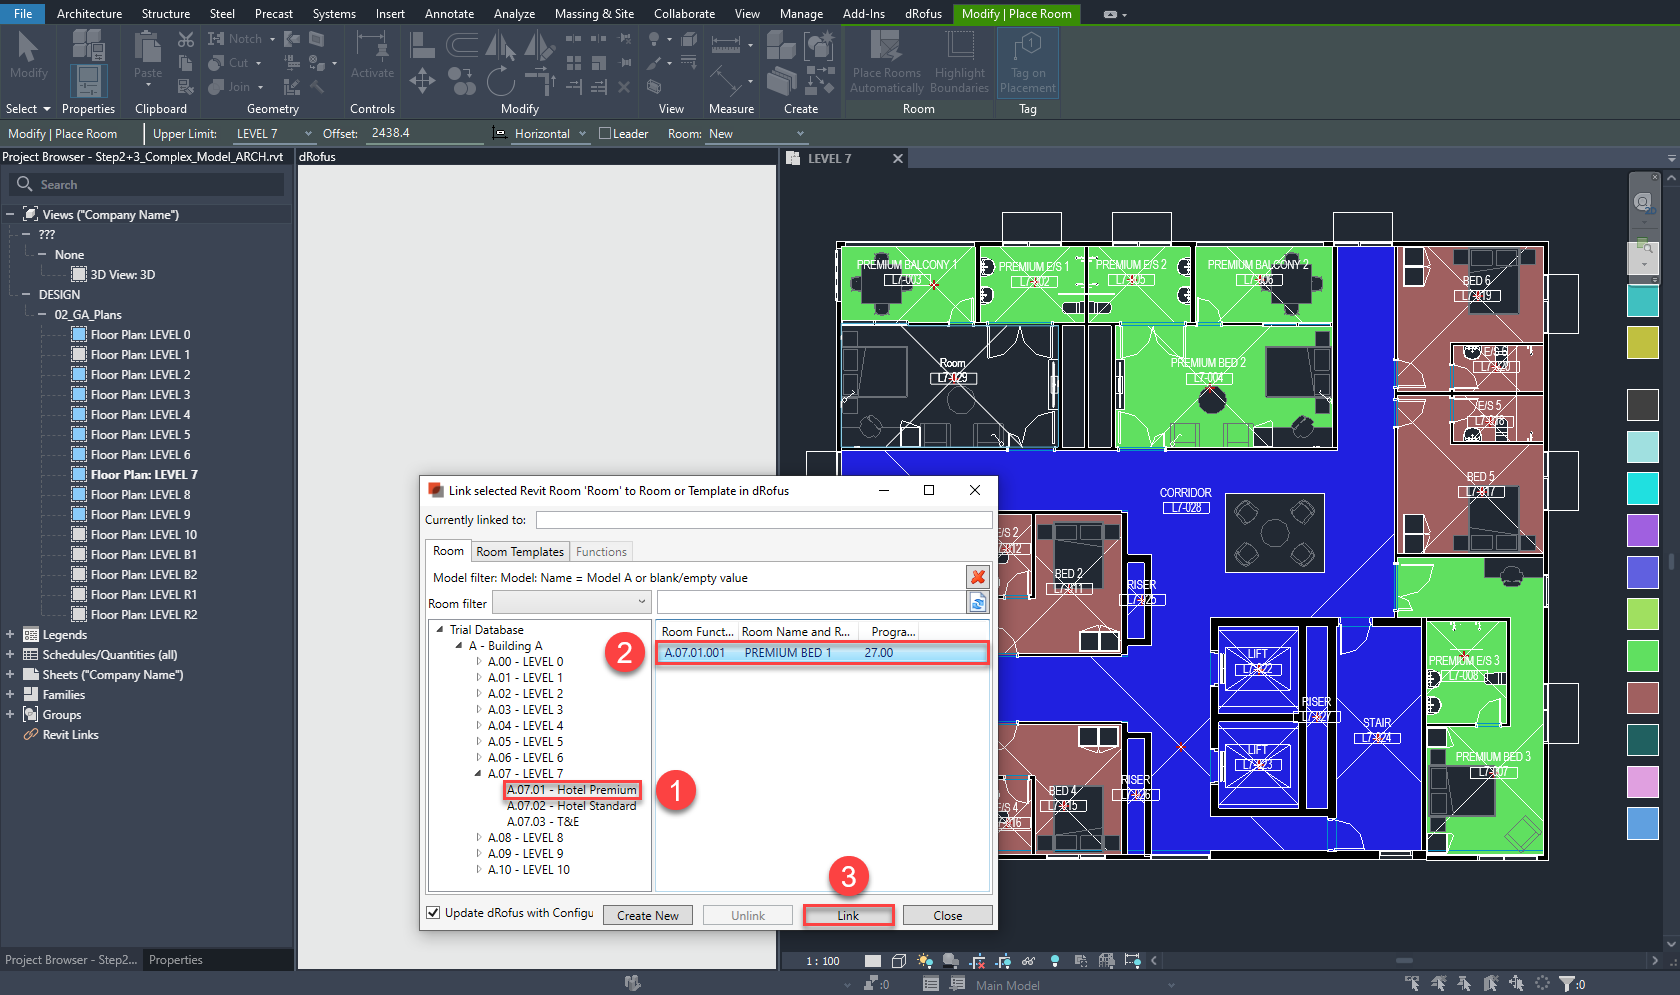
c. Within the pop-up dialog, browse, select and link the dRofus Room as follows:
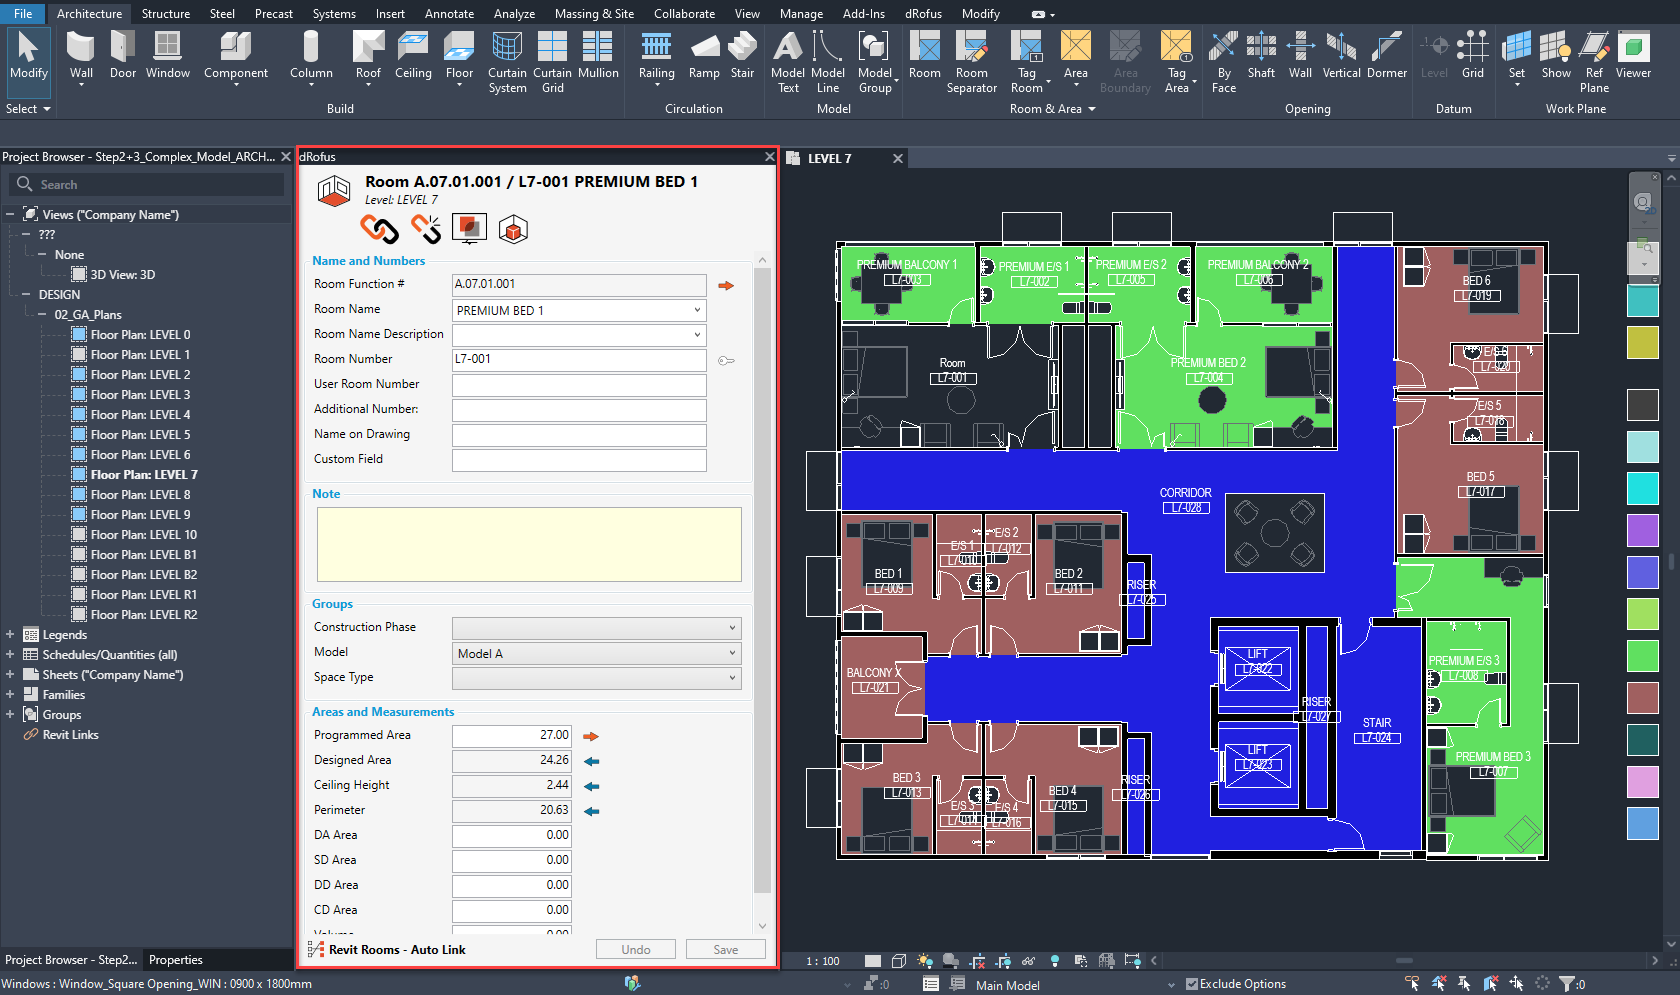
d. Hit “Esc” to stop placing Rooms in Revit, then review the live dRofus data for this new Revit Room within the dRofus Panel:
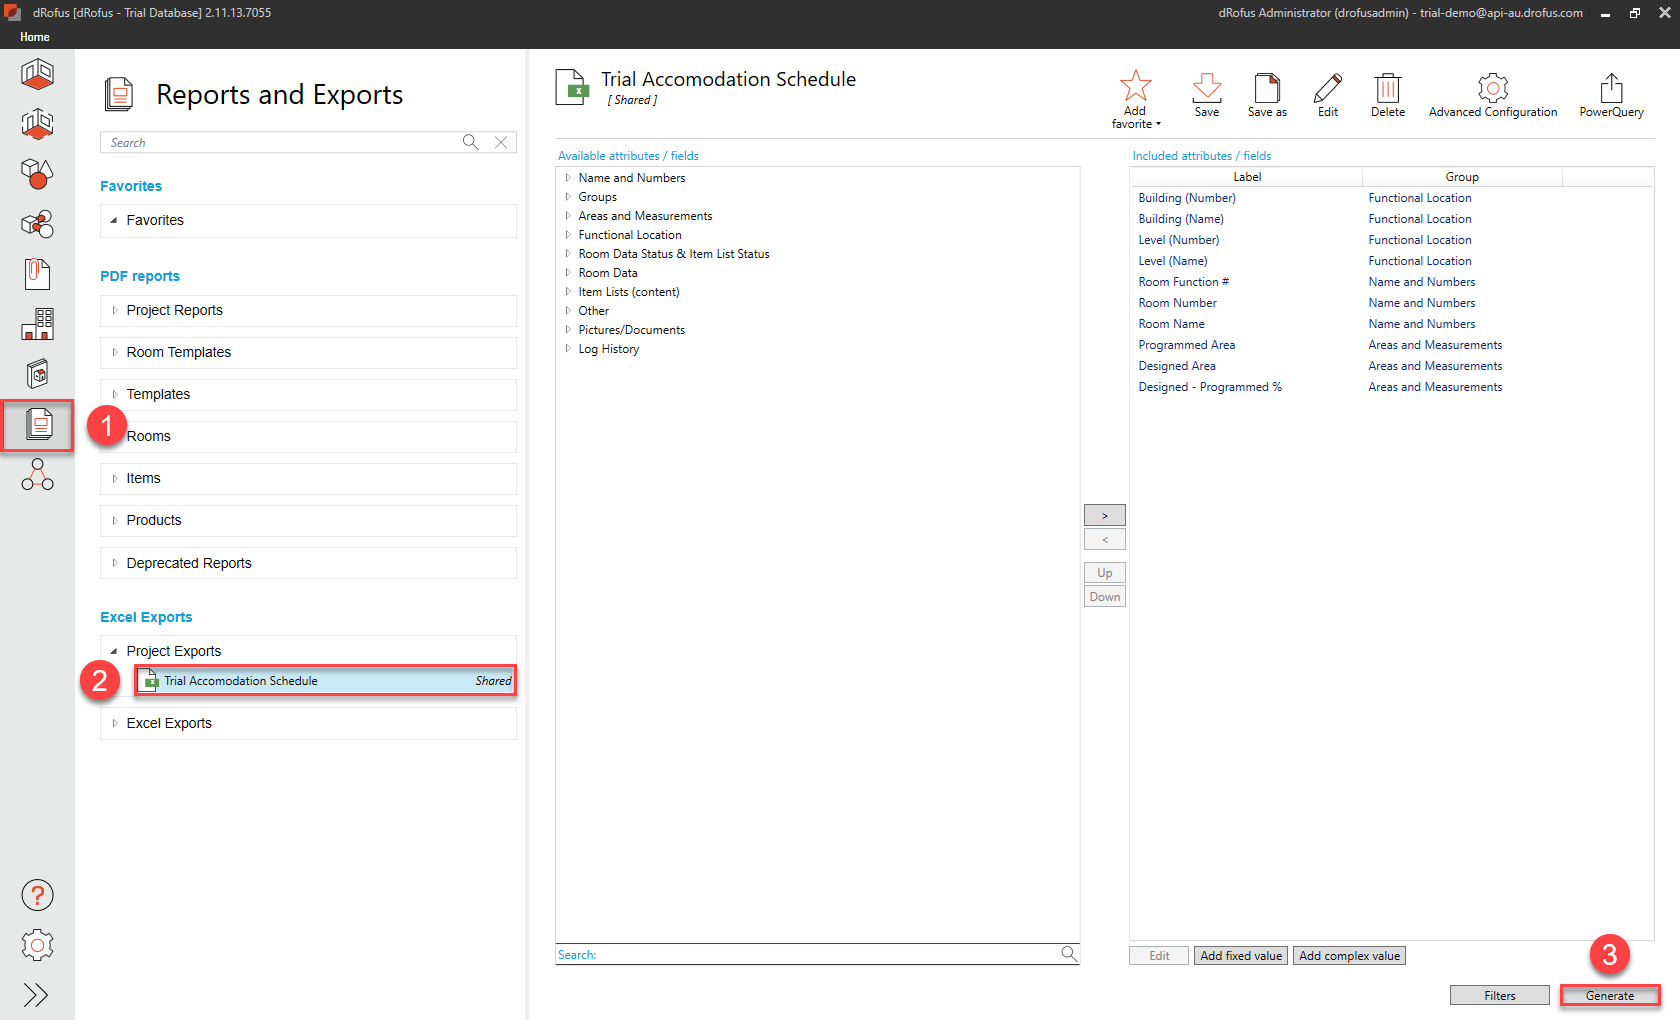
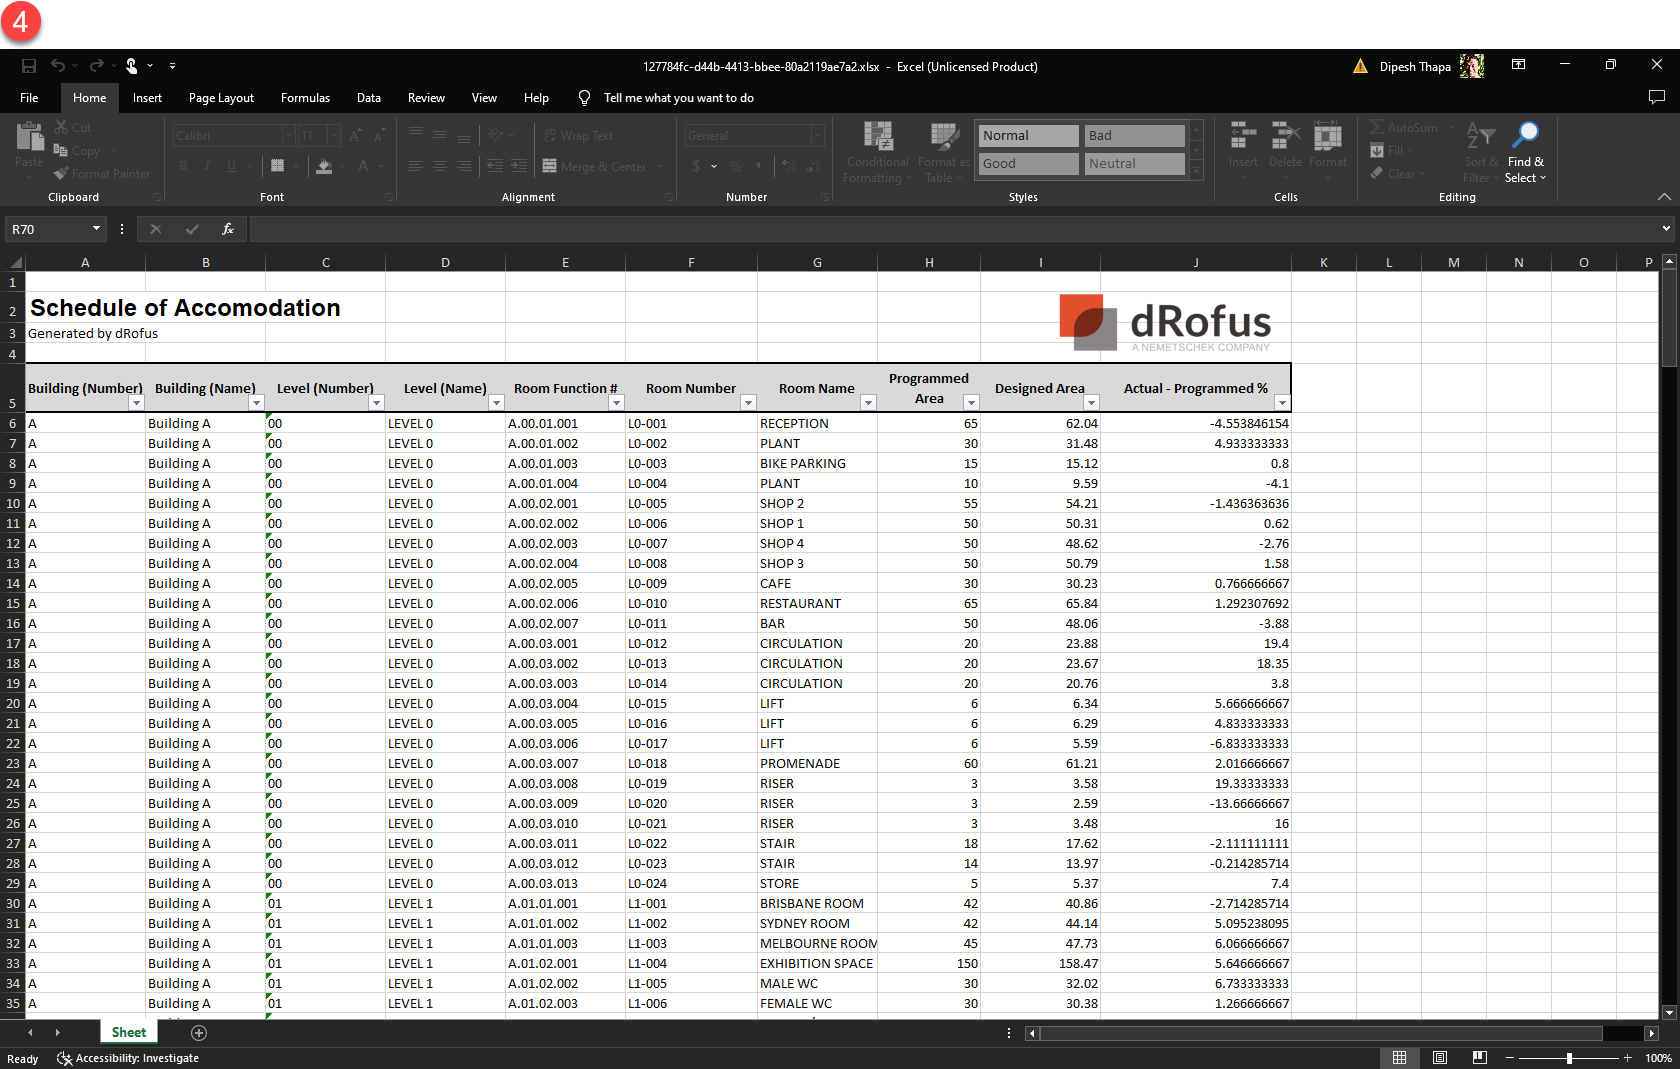
e. Generate the Excel Export called “Trial Accommodation Schedule”:
-
Link dRofus Item Type to Revit Family Type
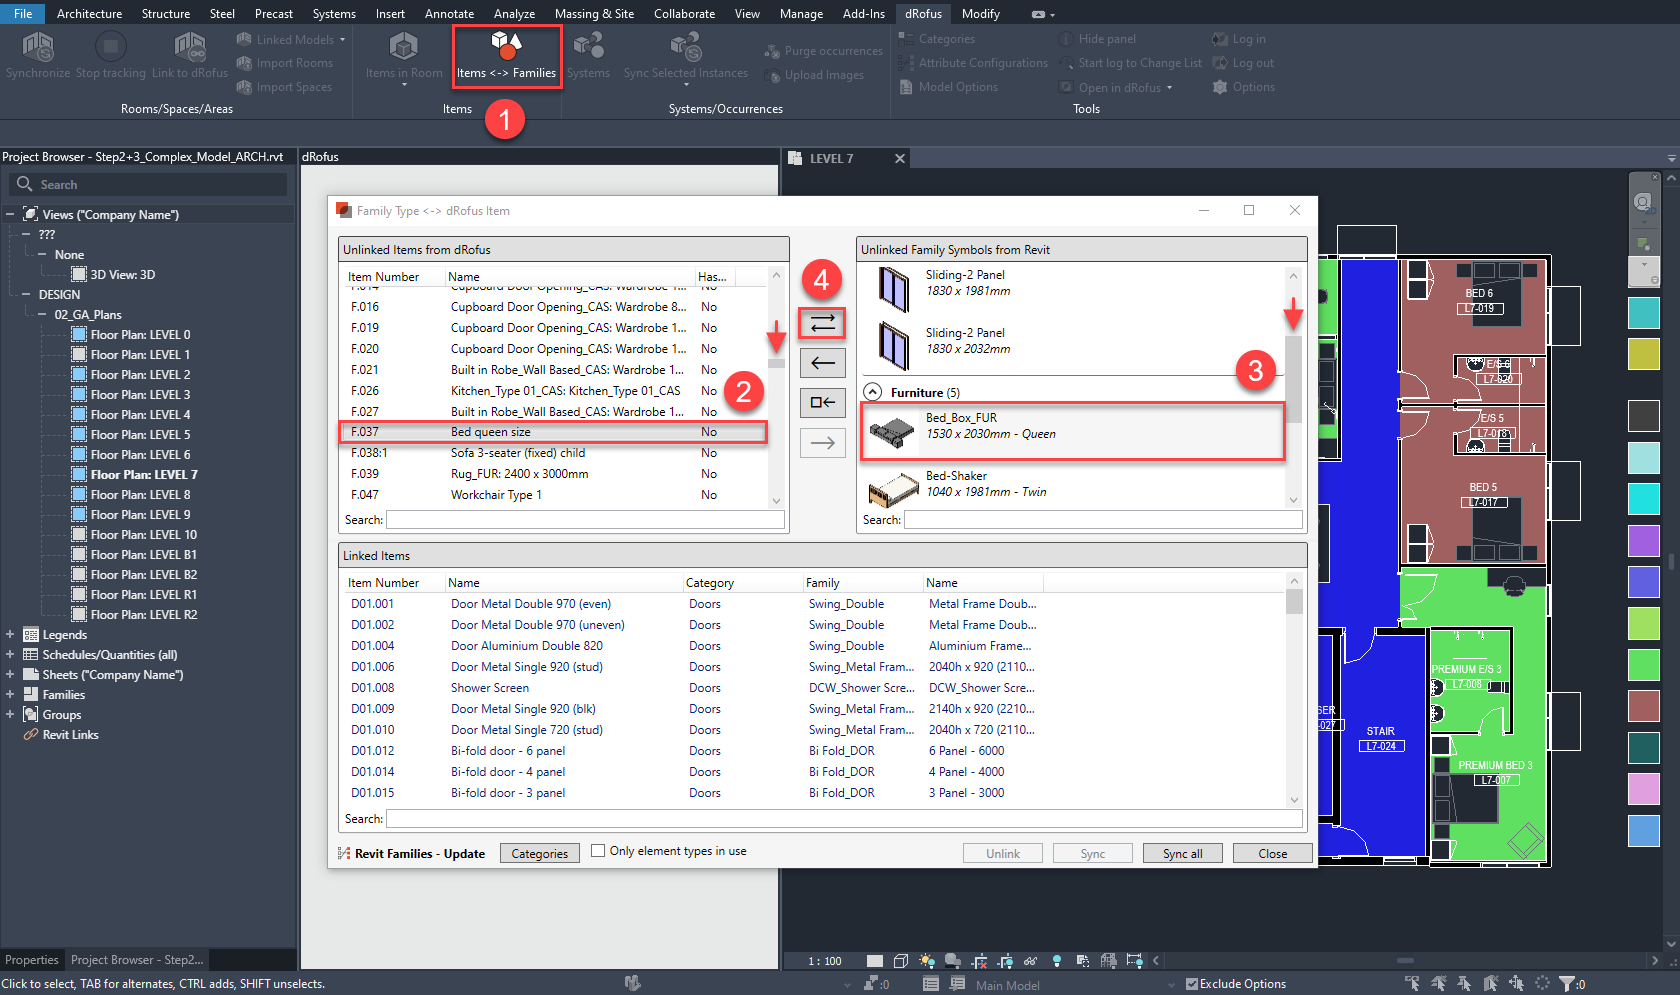
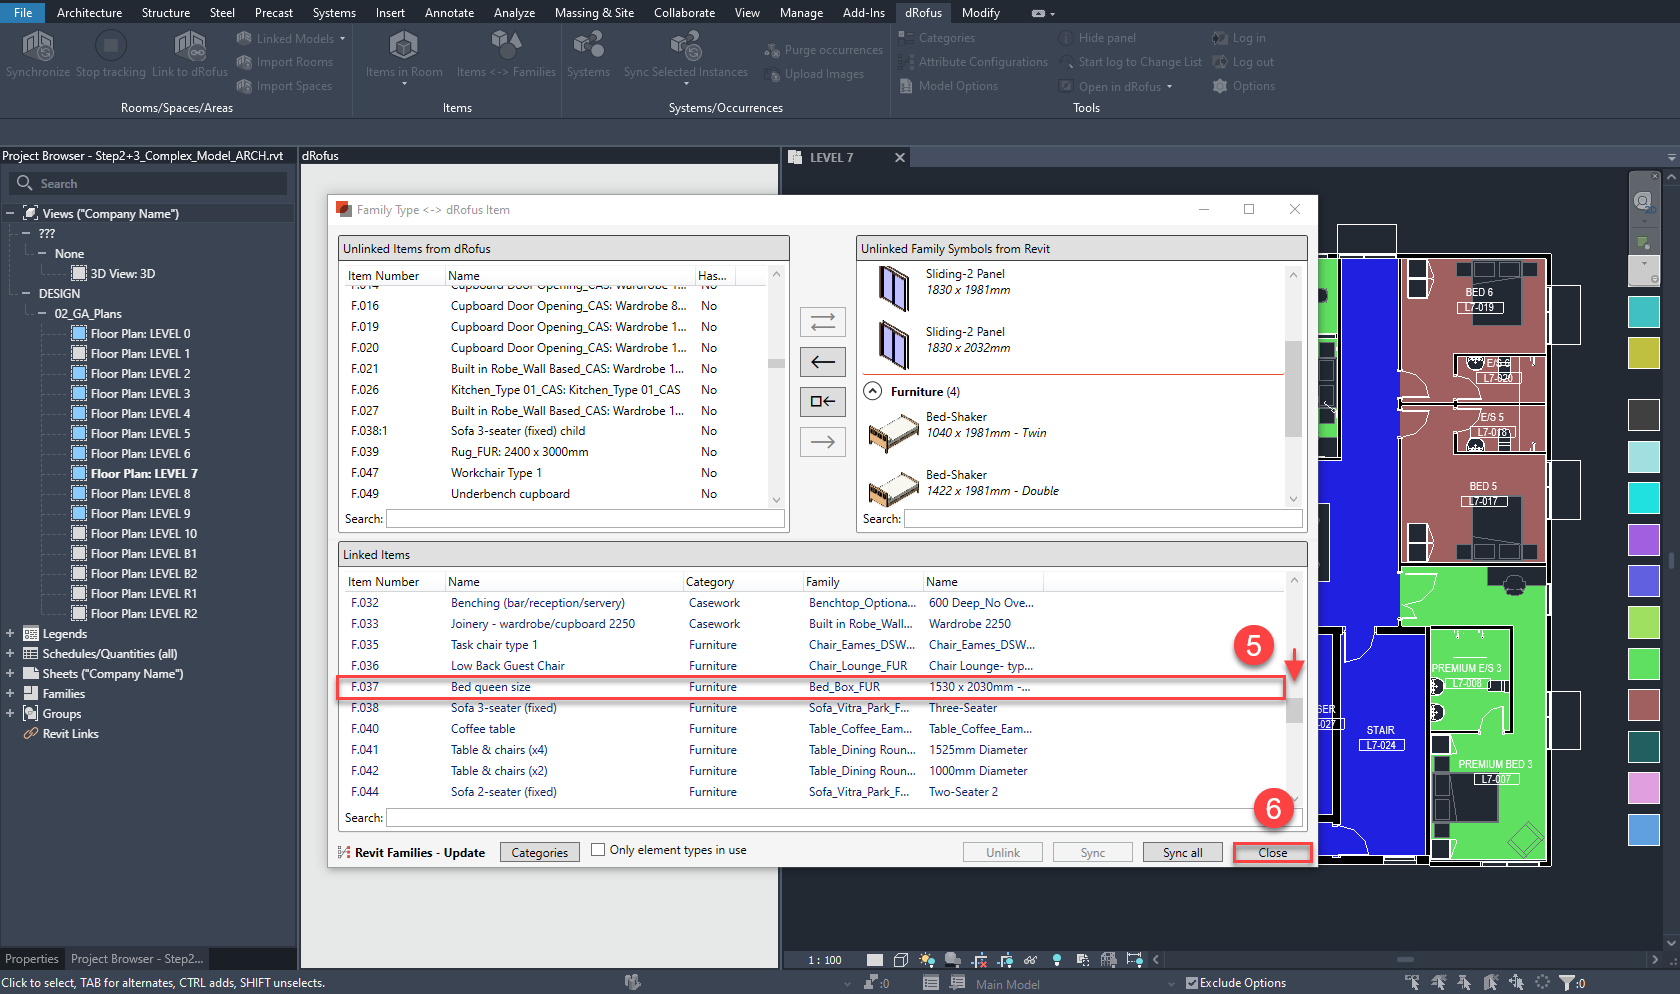
a. Bring up the Items <-> Families dialog and link the highlighted dRofus Item to it’s Revit Family Type counterpart:
-
Update Occurrences of Items from Revit Model
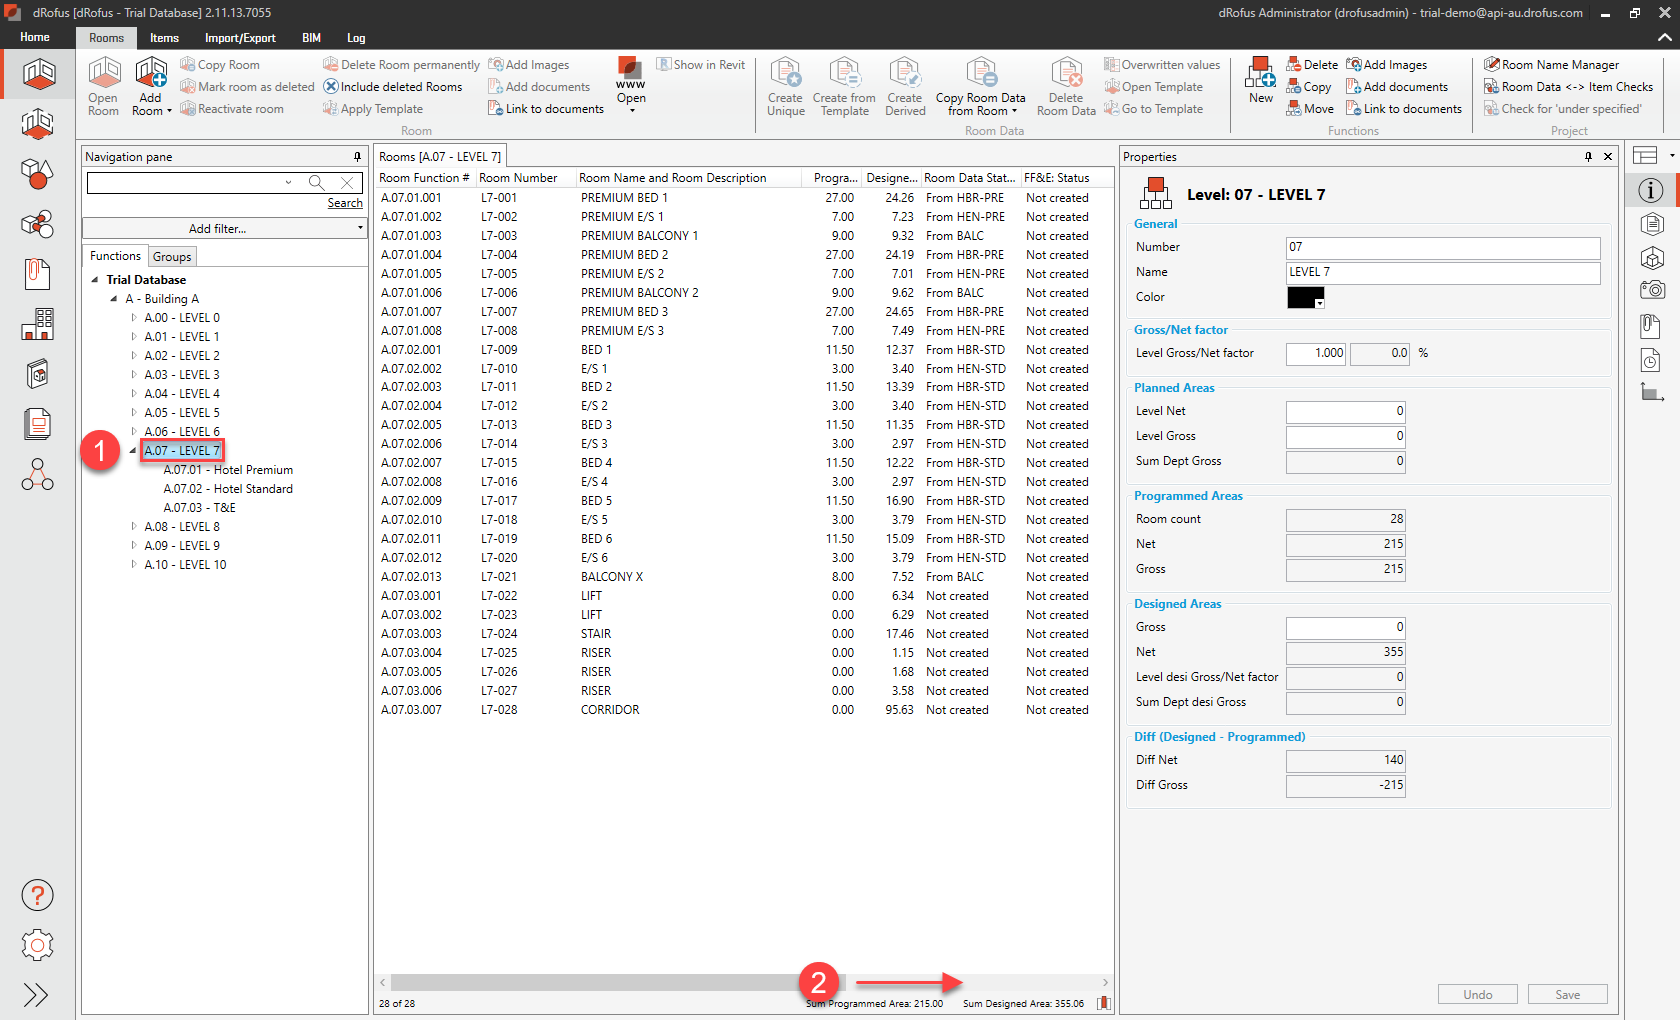
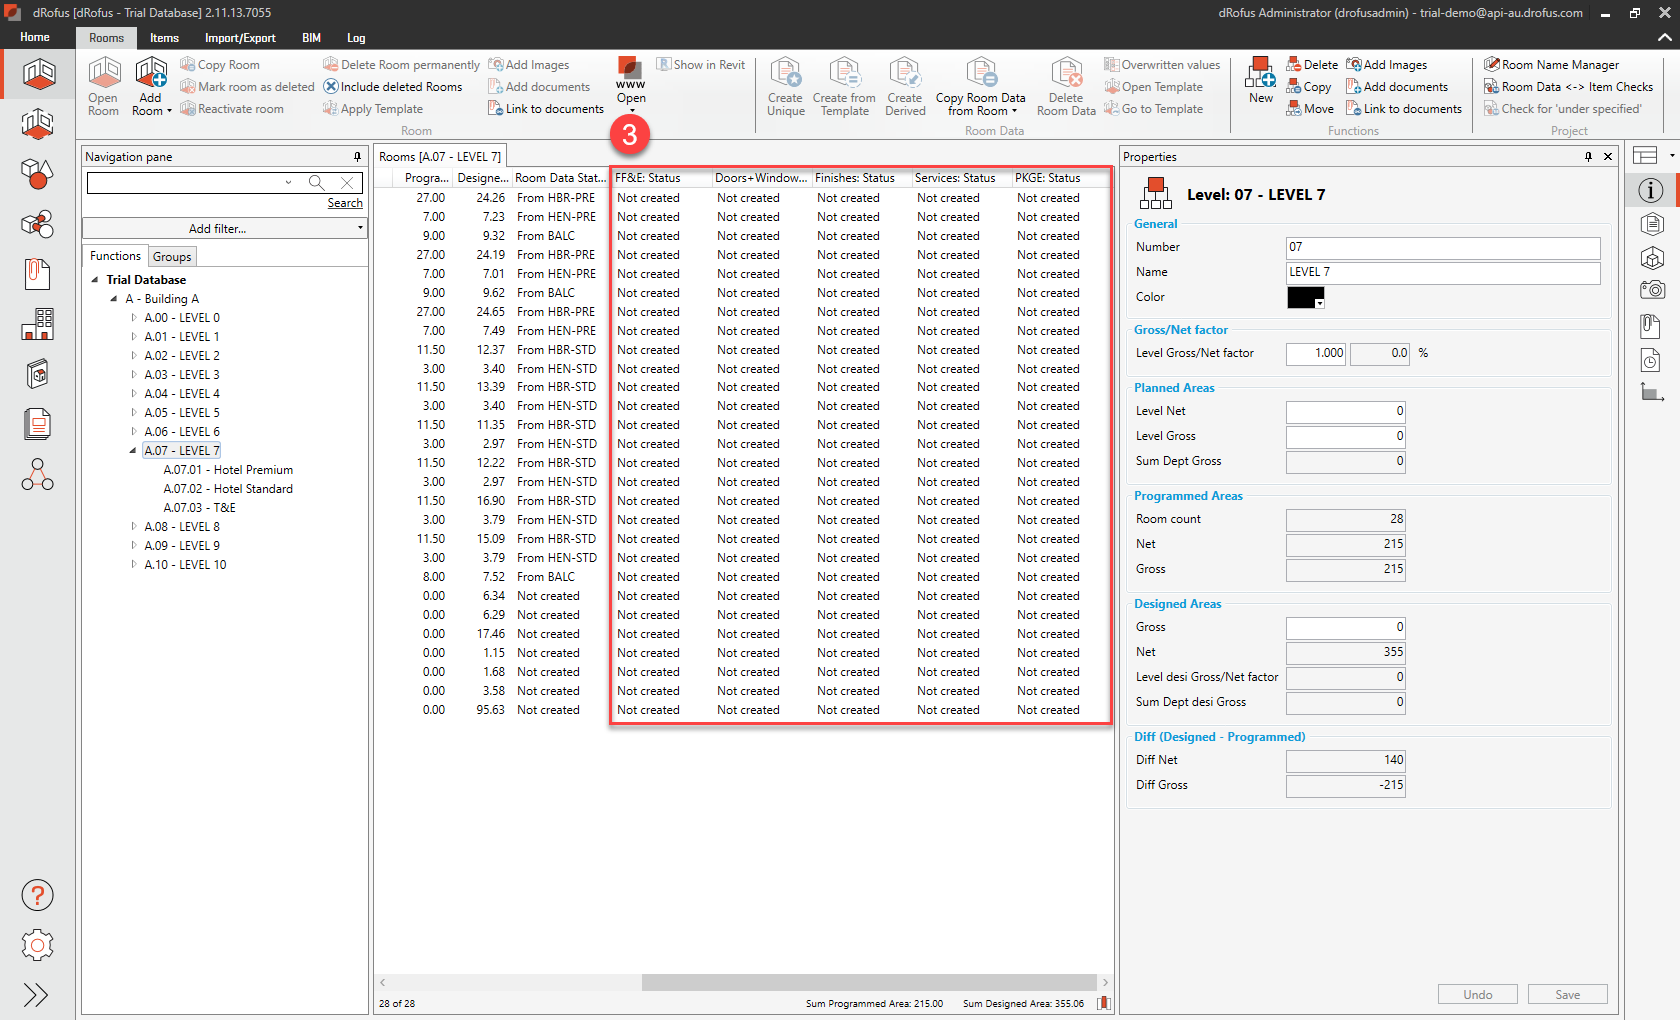
a. In dRofus, go to “LEVEL 7” and note that none of the Rooms' 5 x Item List Statuses have any definition (i.e., their Statuses are all “Not created”):
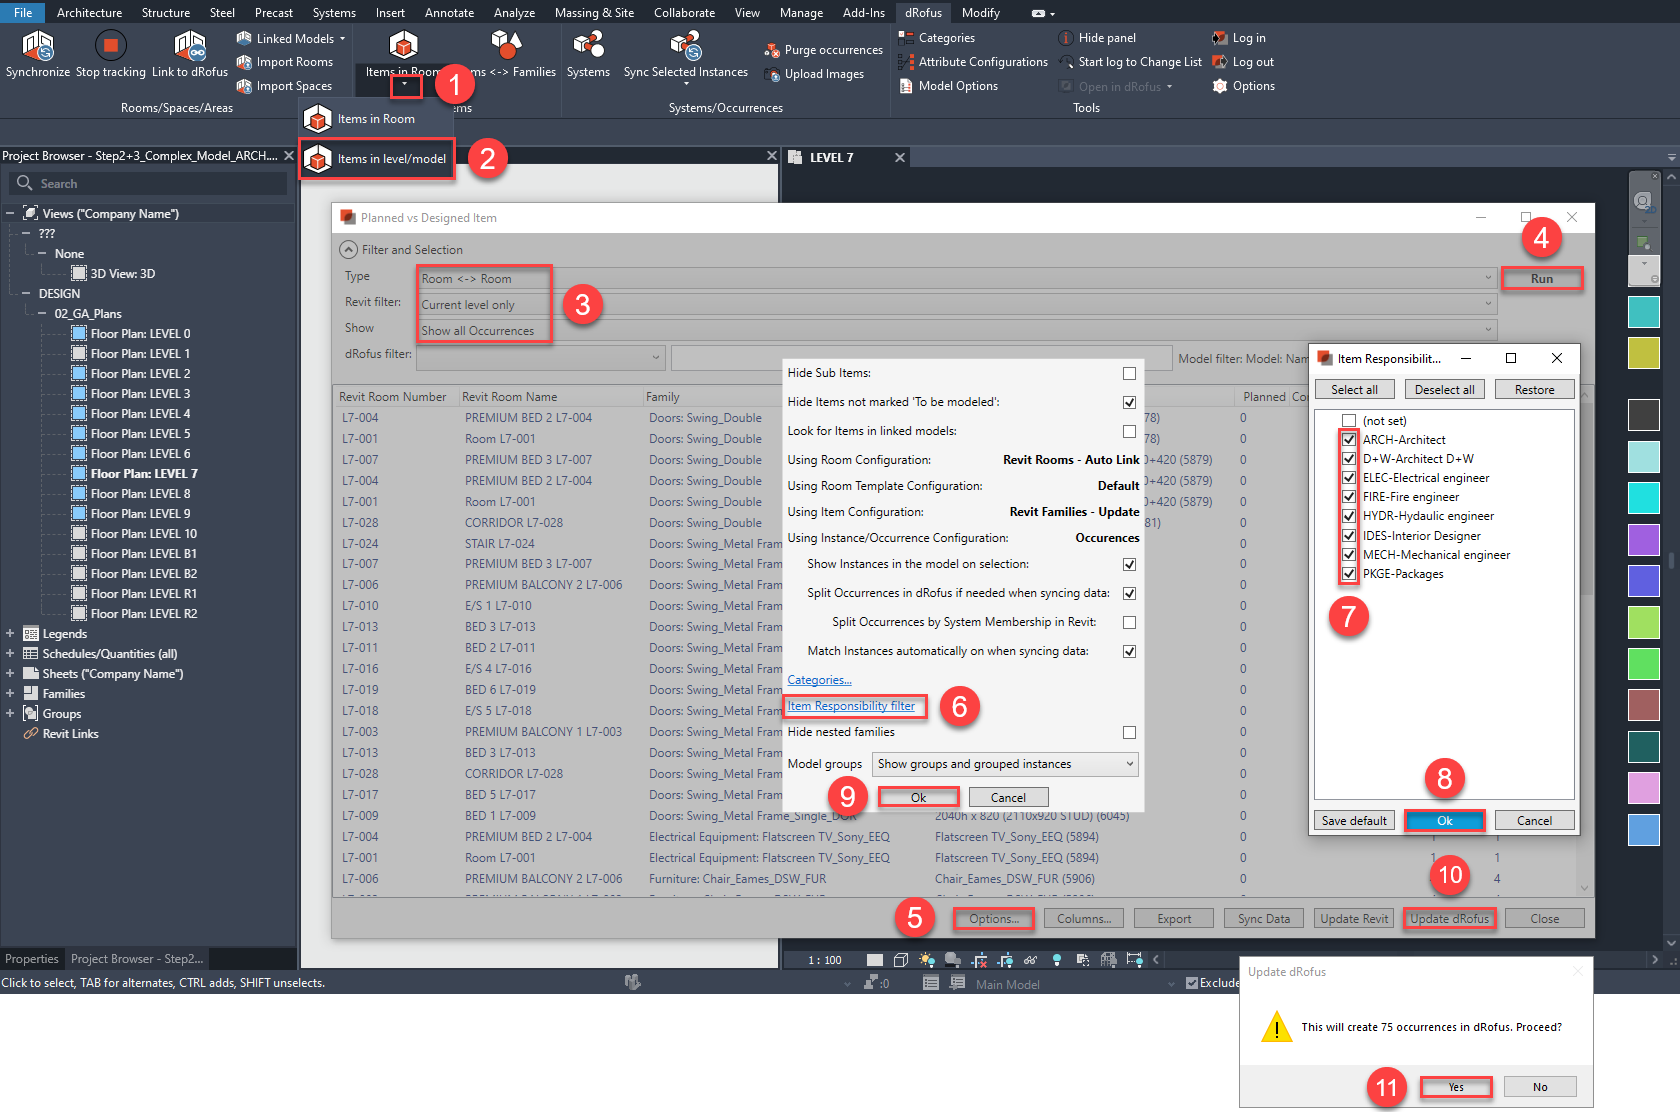
b. Update Occurrences in dRofus based on the Revit model (ensuring that the highlighted selections are made in the following sequence of steps):
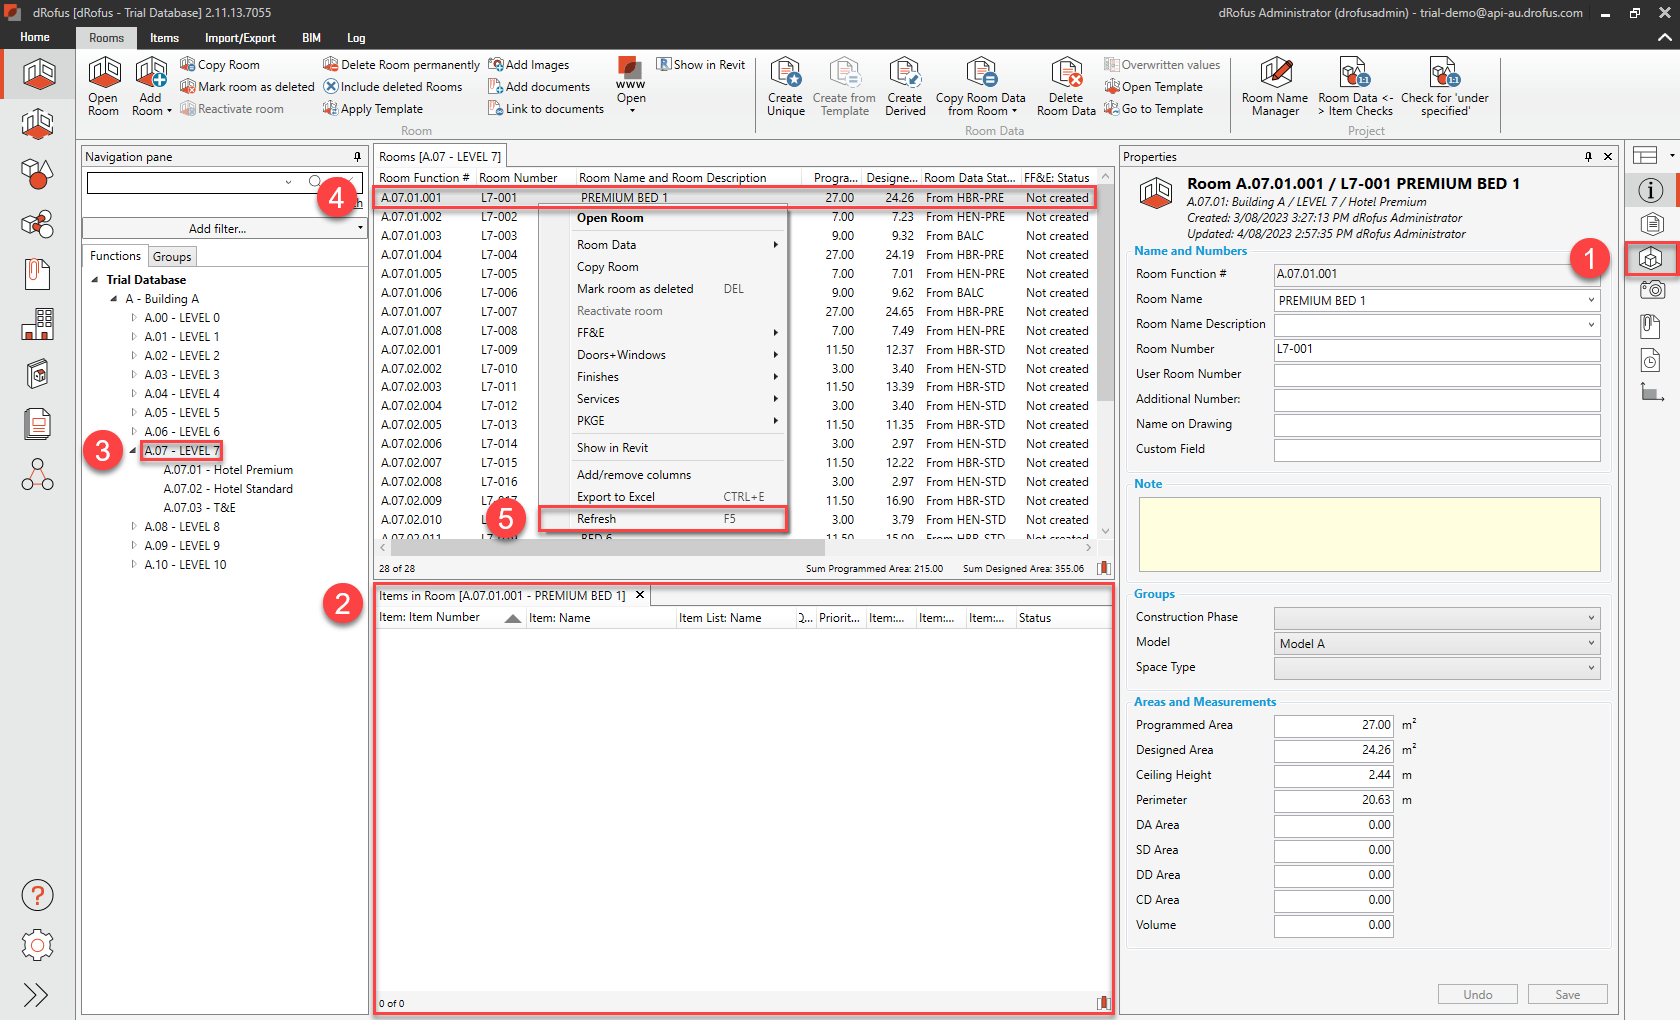
c. Within dRofus App, activate the Items in Room Panel, ensure you select “LEVEL 7”, right-click on any Room, then select “Refresh”:
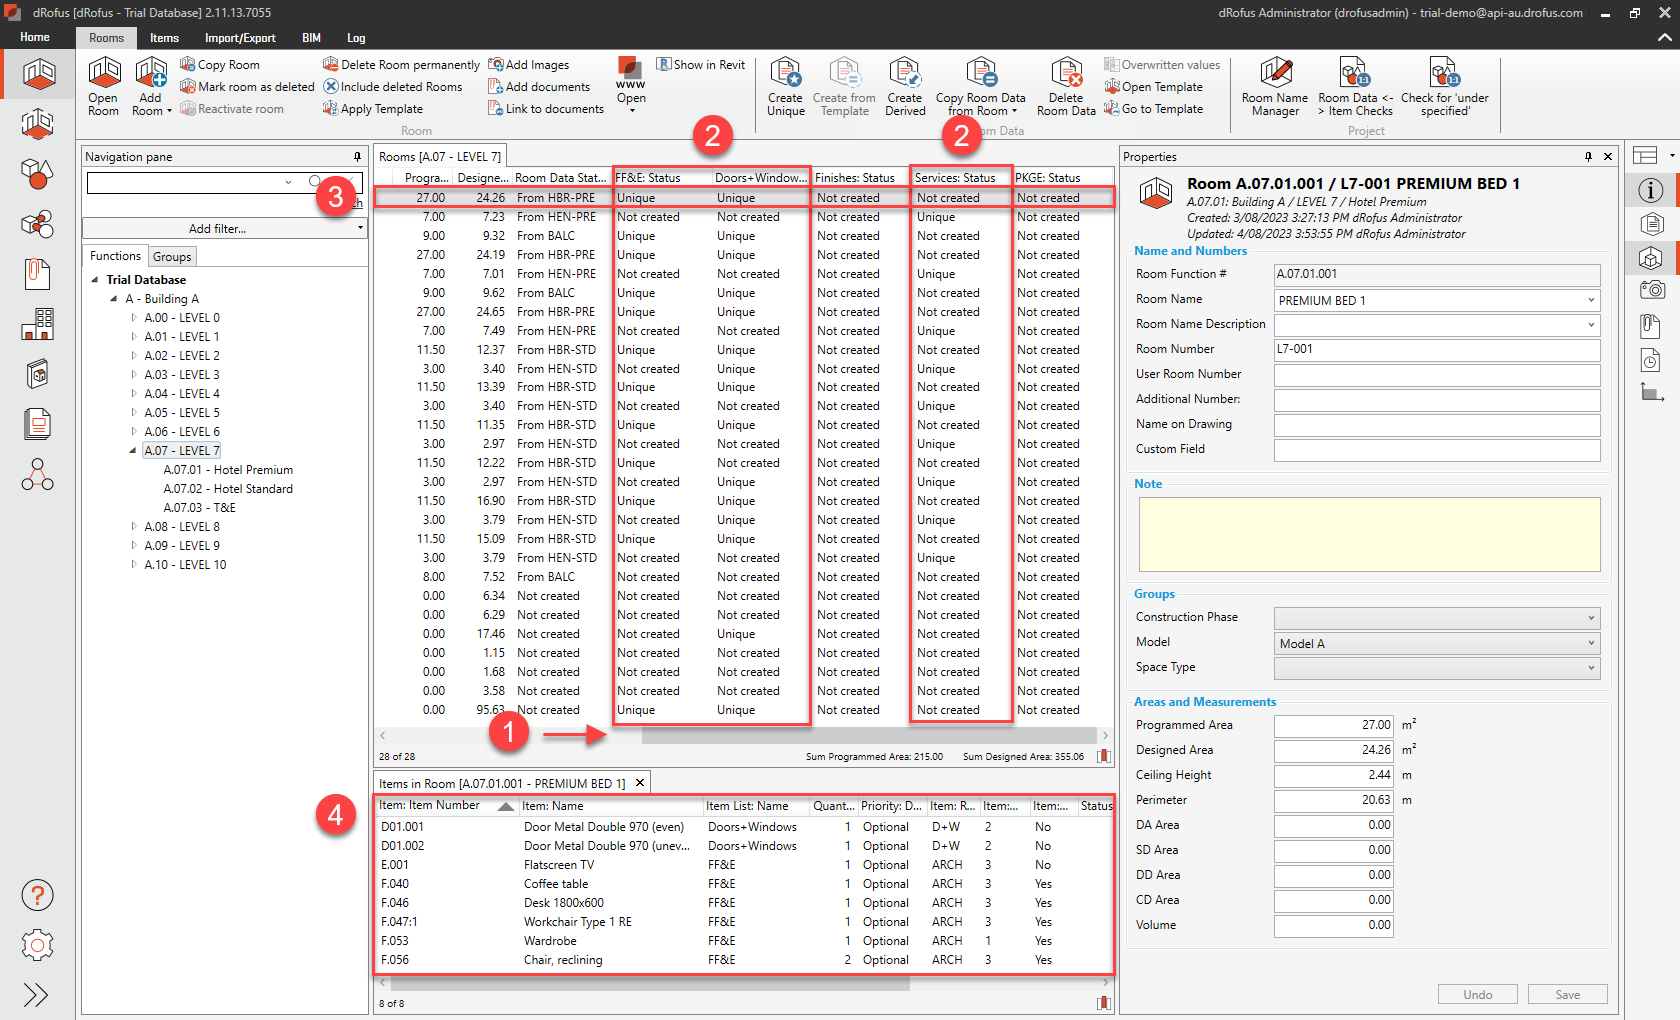
d. Note that some of the FF&E, Doors + Windows, and Services Statuses of some of the Rooms now have a definition (i.e., their Statuses are “Unique”). If you then select the first Room (i.e., “PREMIUM BED 1”), note within the Items in Room Panel, the Occurrences that have just been updated from the Revit model:
-
Edit Room Template and Report
a. Within “Level 07”, click on the “Room Name” column header to sort alphabetically, and then note that the 3 x Bedrooms called “PREMIUM BED 1”, “PREMIUM BED 2” & “PREMIUM BED 3” all have their Room Data Statuses as “From HBR-PRE”:
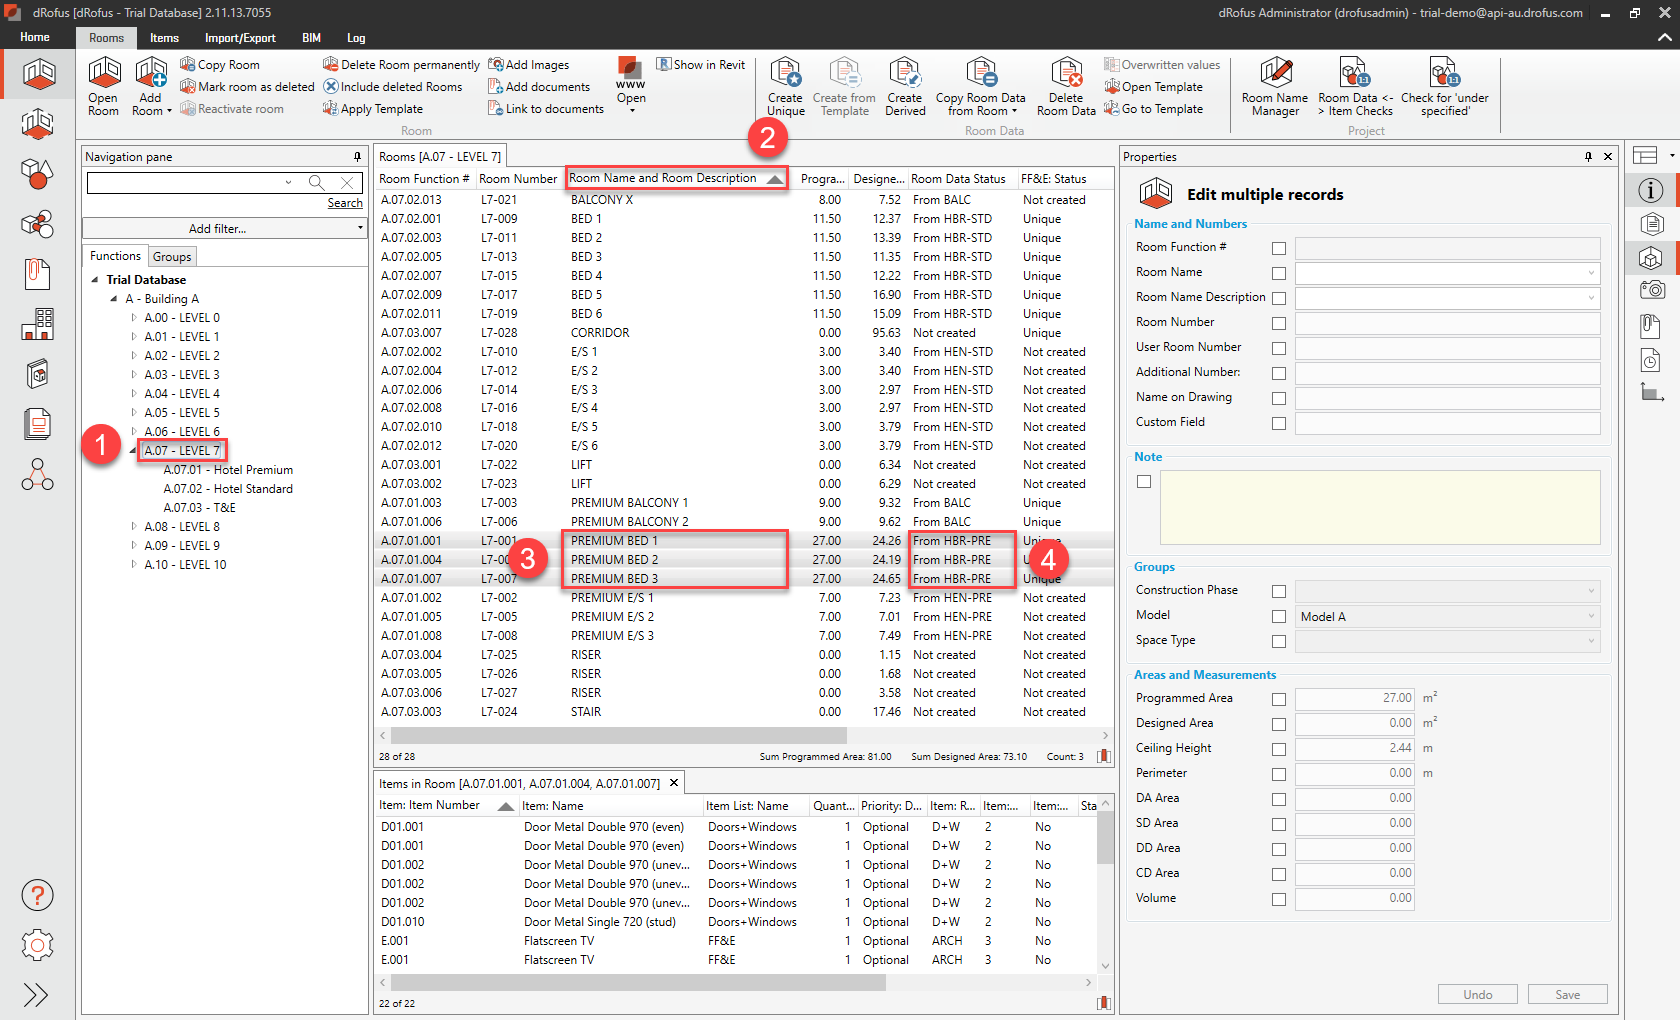
b. Go to the Room Templates Module, activate the Room Data Panel, select the Room Template called “HBR-PRE - Hotel Bed Room - Premium”, and then view the data for this Room Template:

Note: you can select the “Template Usage” Icon highlighted above (in green) if you’d like to view the Rooms using this Room Template’s Data.
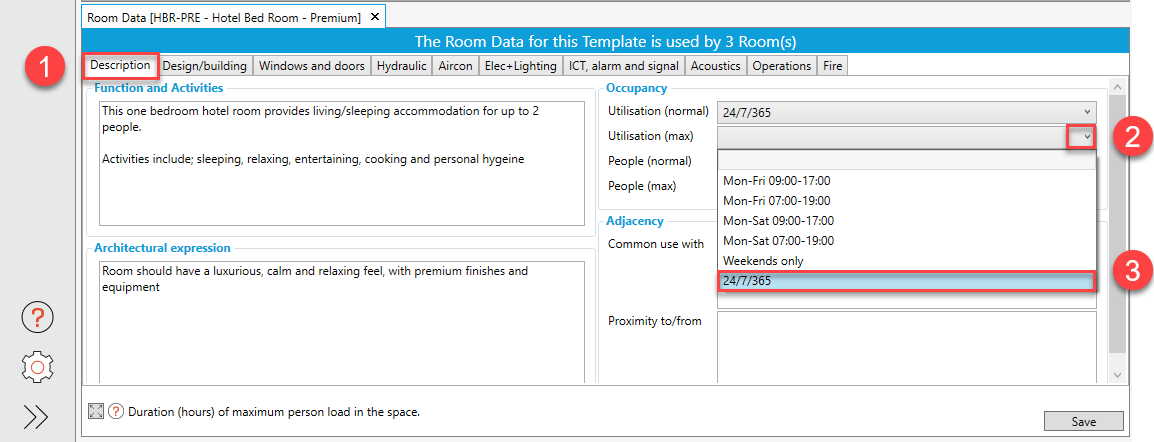
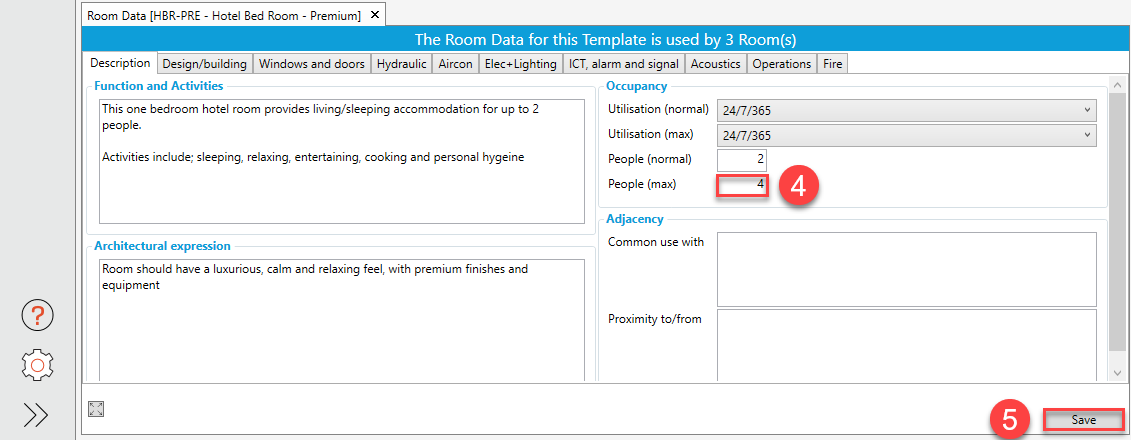
c. Within the Flag called “Description”, edit some Room Data, for example, “Utilisation (max)” and “People (max)”, and then hit “Save”:
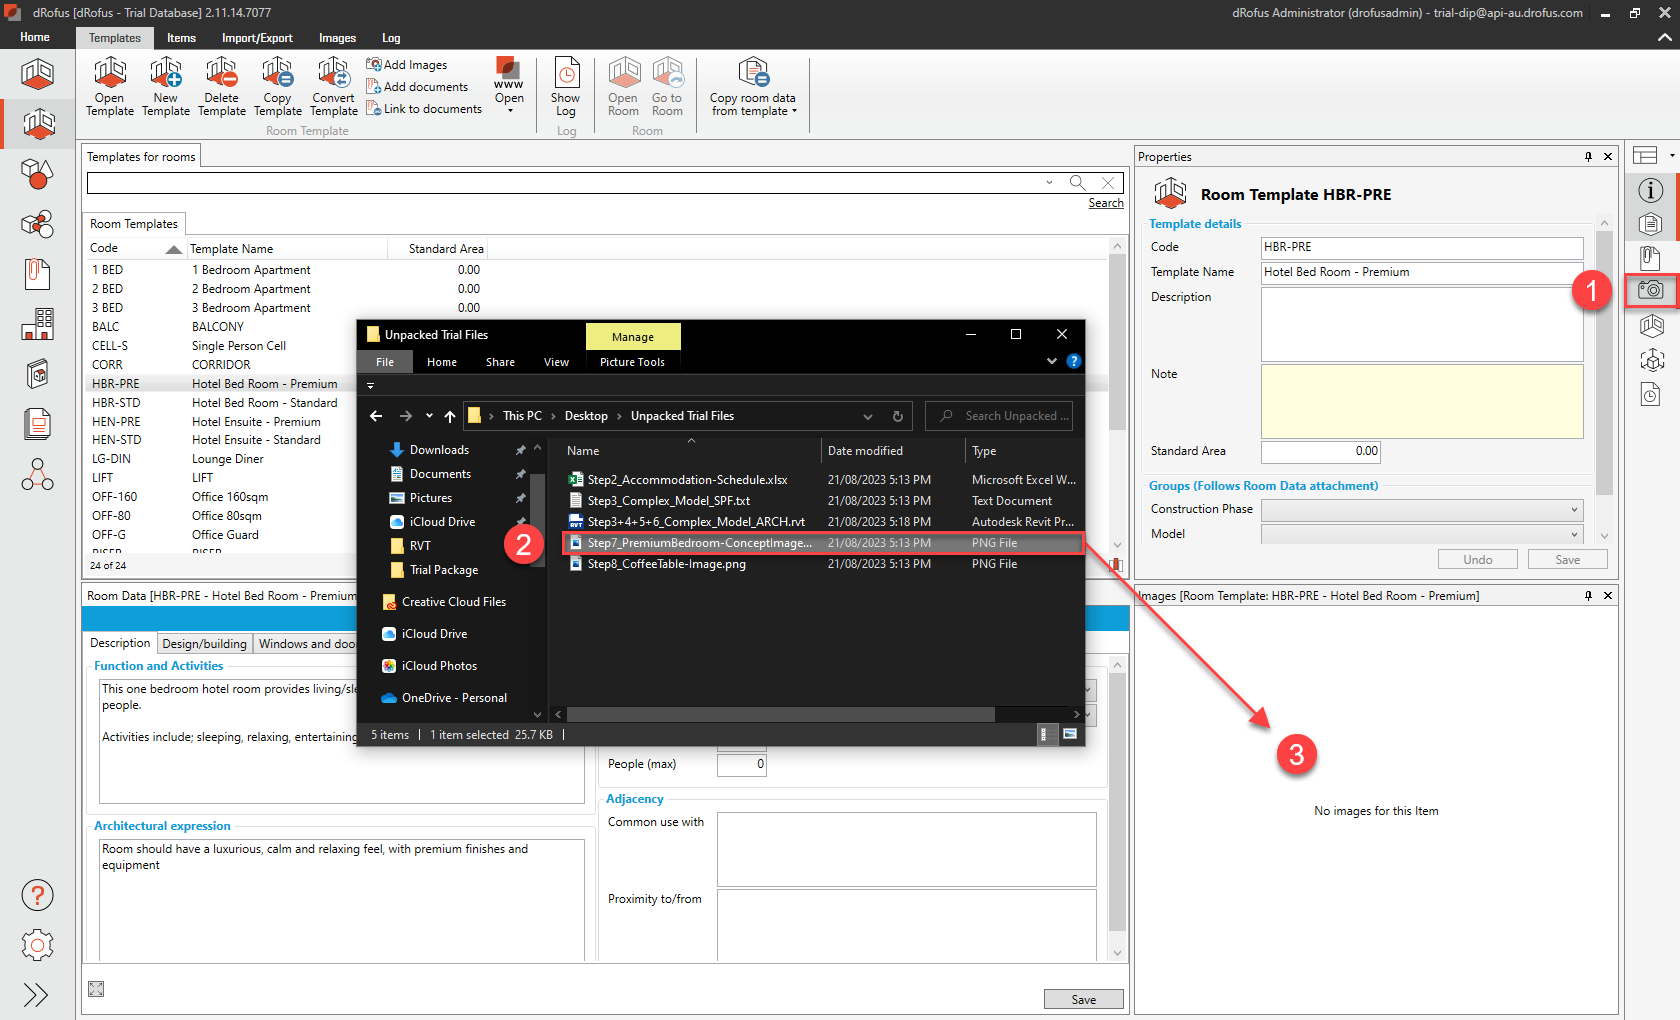
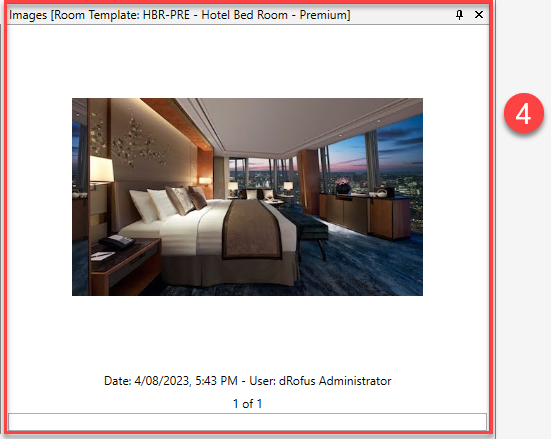
d. Activate the Images Panel, then from your Windows Explorer (or similar), drag and drop to upload image “Step7_PremiumBedroom-ConceptImage.png” as follows:
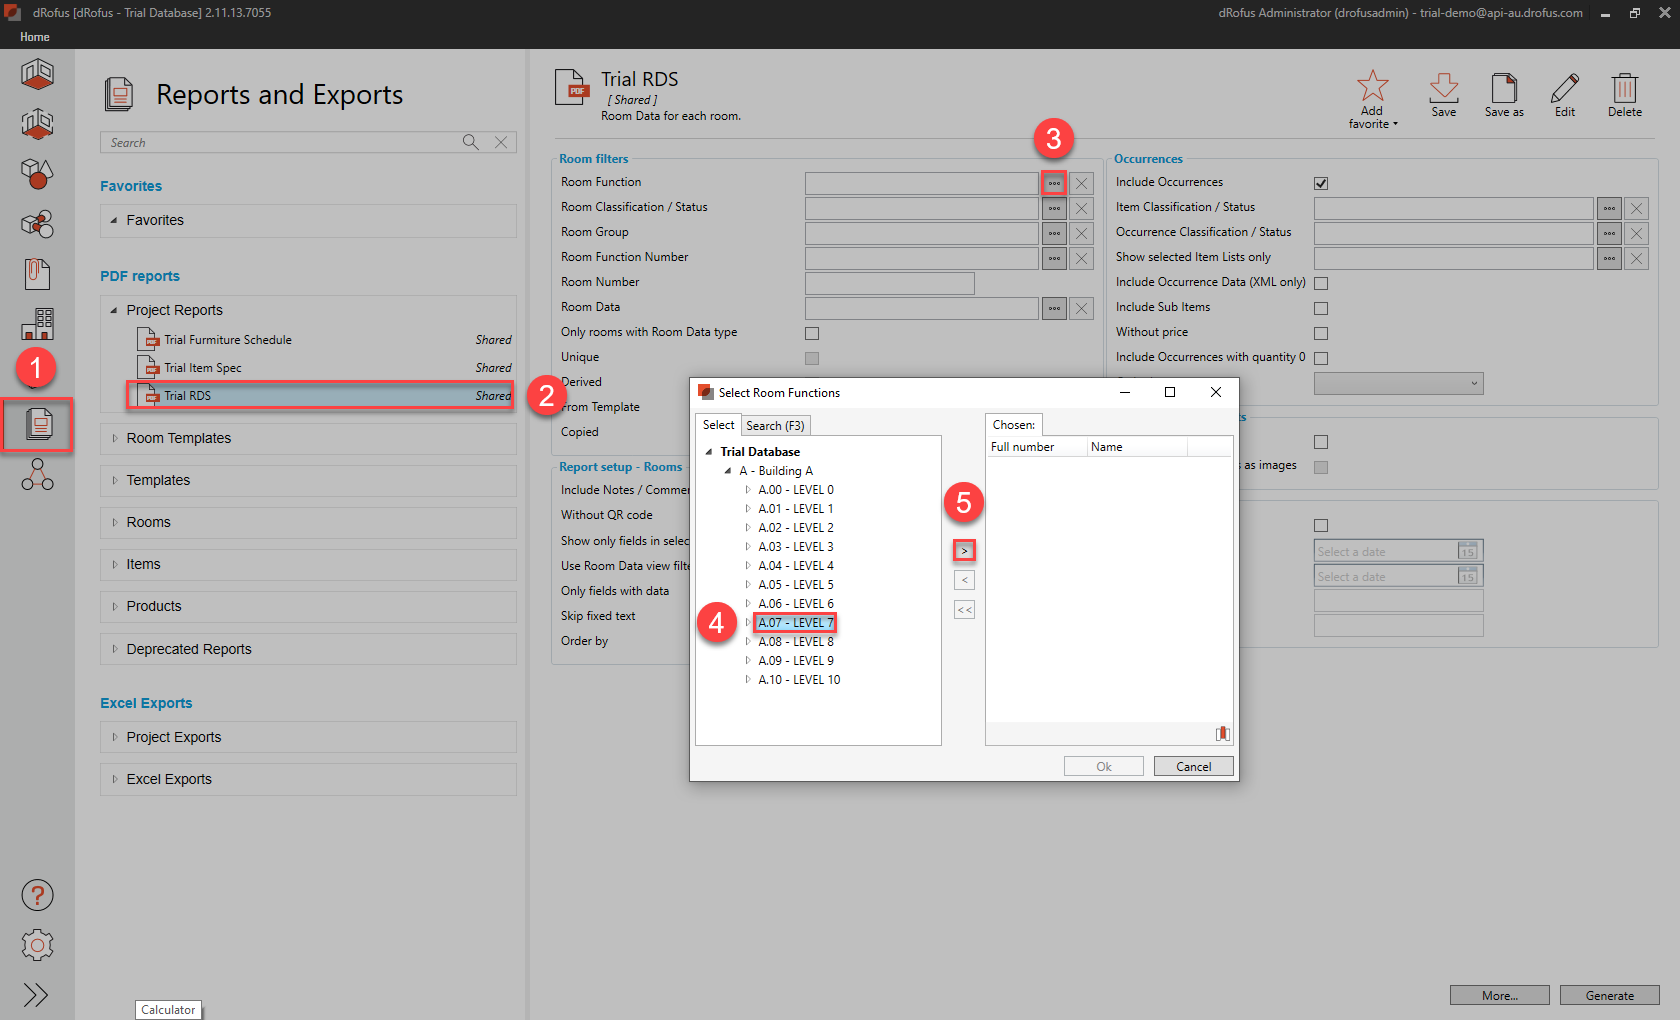
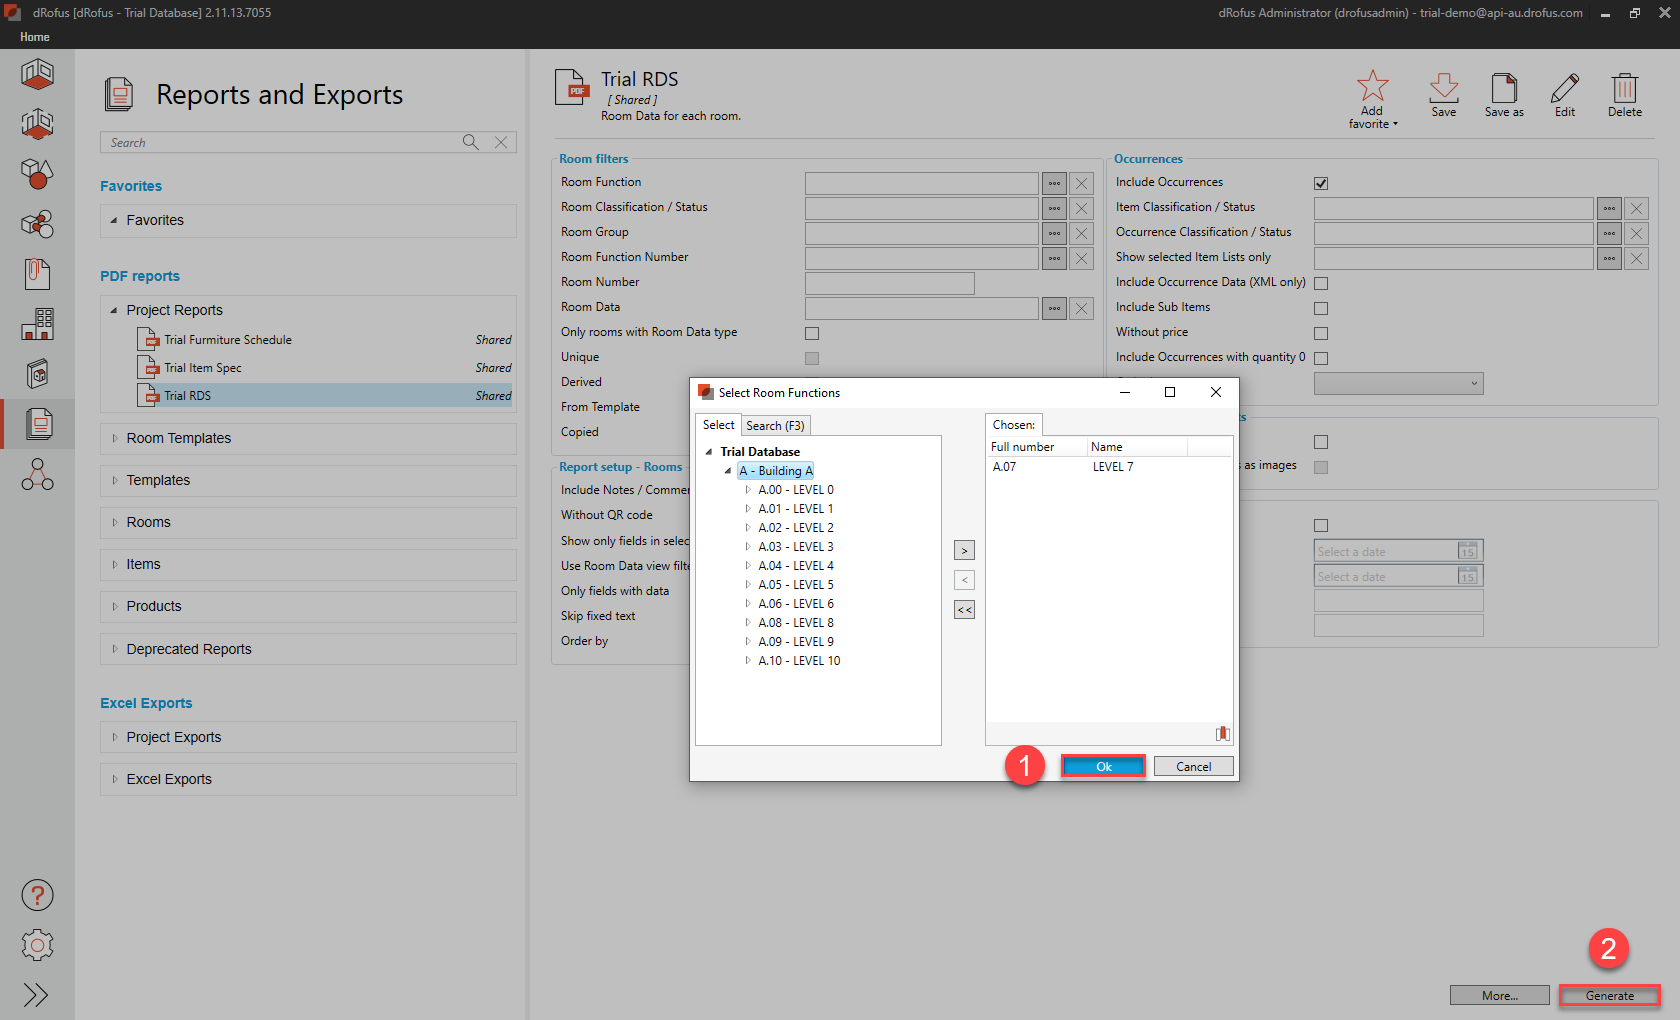
e. Generate the PDF Report called “Trial RDS” (ensuring that the highlighted selections are made in the following sequence of steps):
f. Hit “Ok” and then “Generate”:
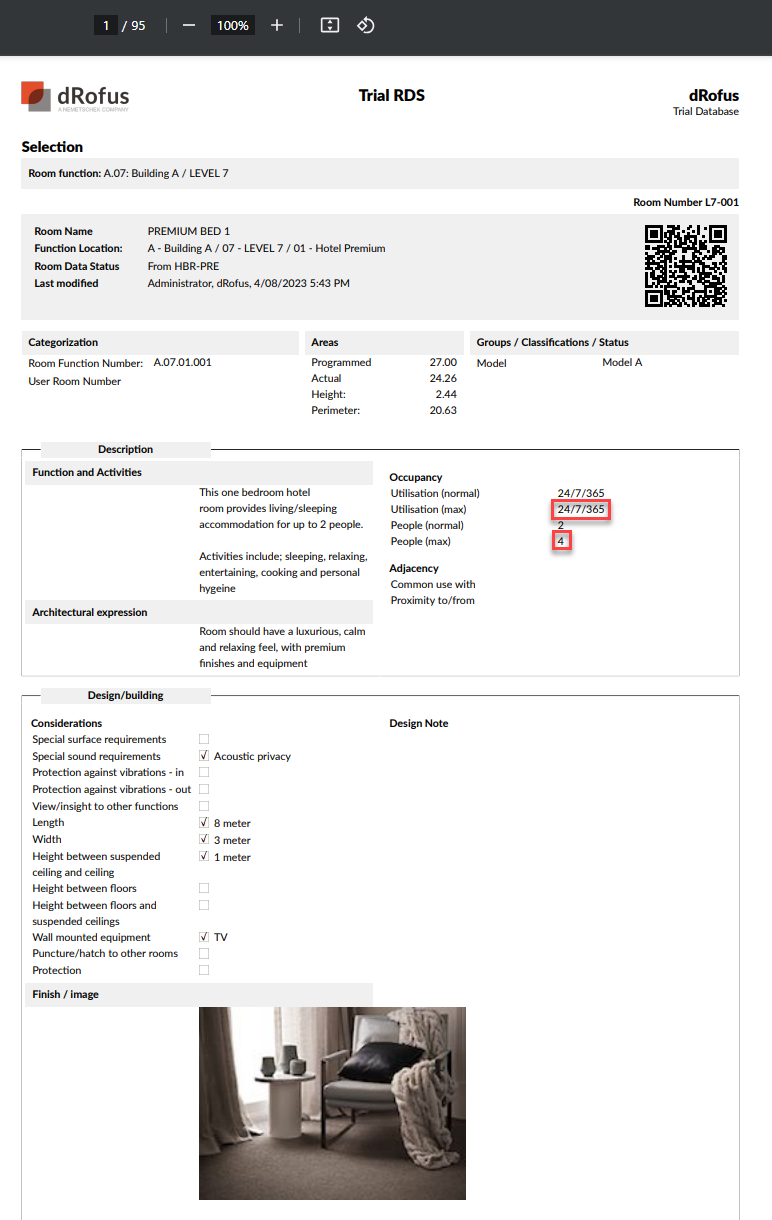
g. Review the PDF Report within your default Web Browser (noting the changes you had made to the Room Data, as well as the Image you had uploaded via the Room Template):
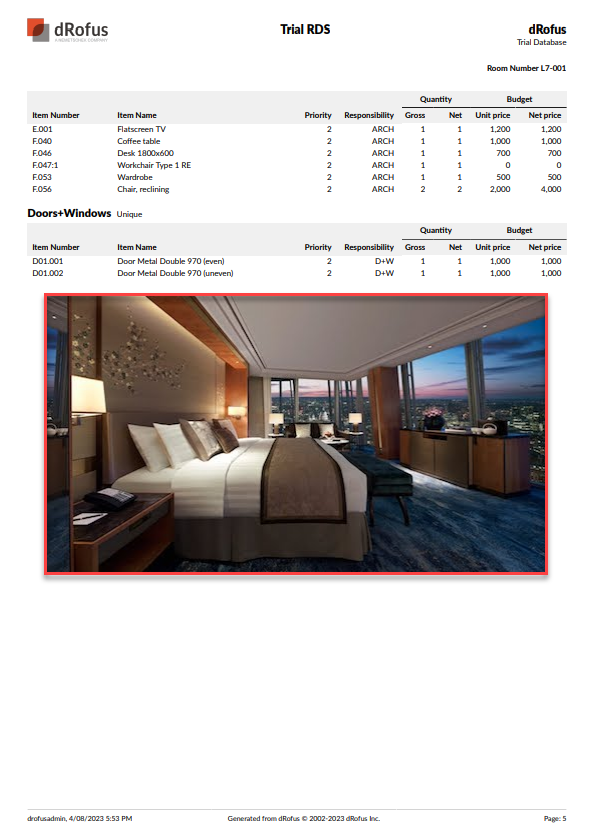
-
Edit Item and Report
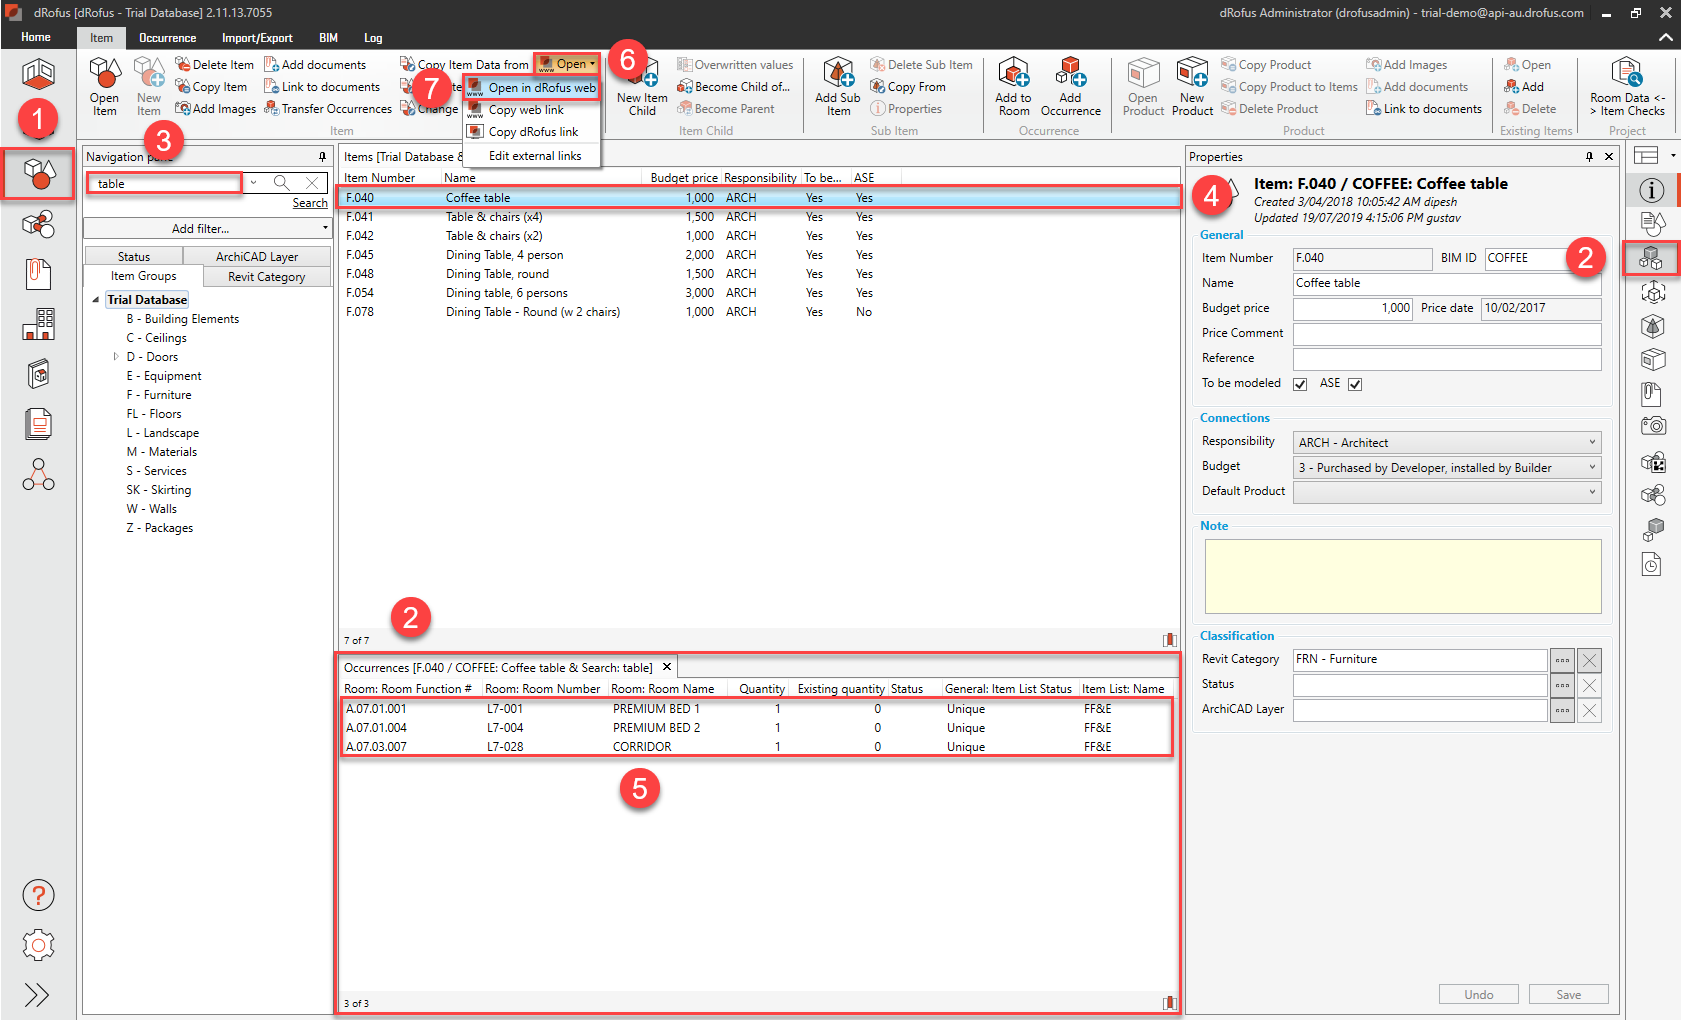
a. In the Items Module, activate the Occurrences Panel, type in “table” within the Search Bar then hit “Enter” on your keyboard, select “Coffee table” and review the 3 x Occurrences / Rooms containing that Item, then select Open in dRofus web:
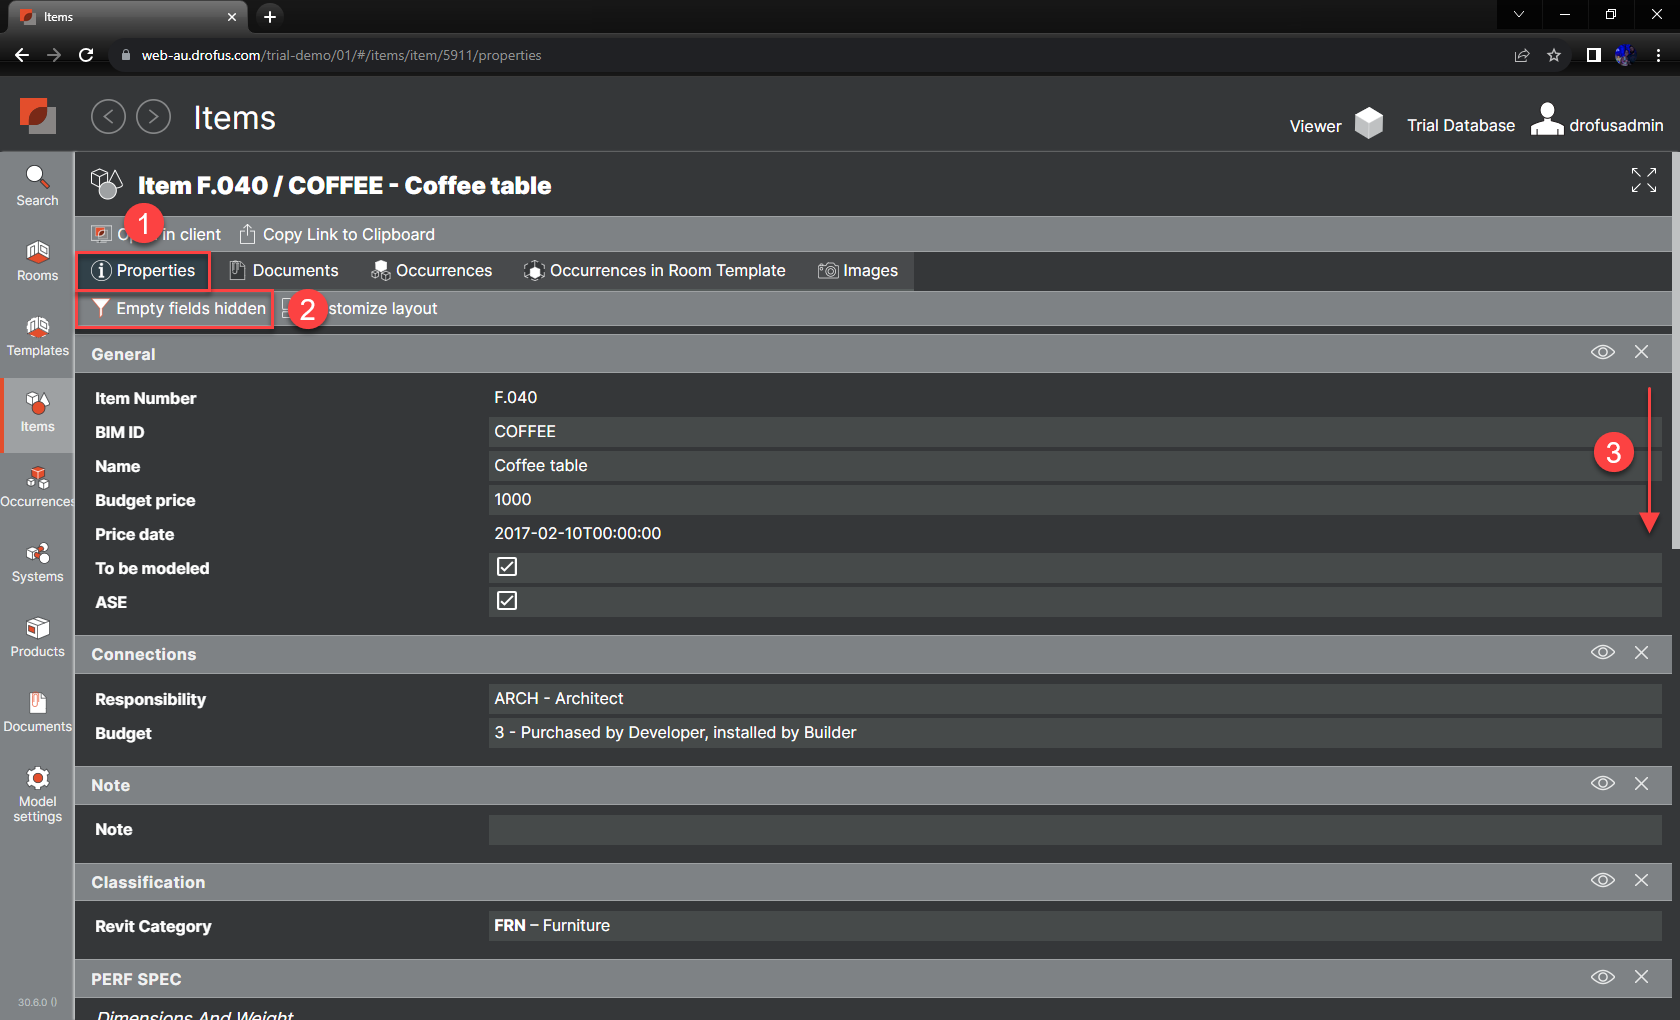
b. Log in to dRofus Web within your web browser, go to Images, then Add new, then browse file to upload image “Step8_CoffeeTable-Image.png” as follows:

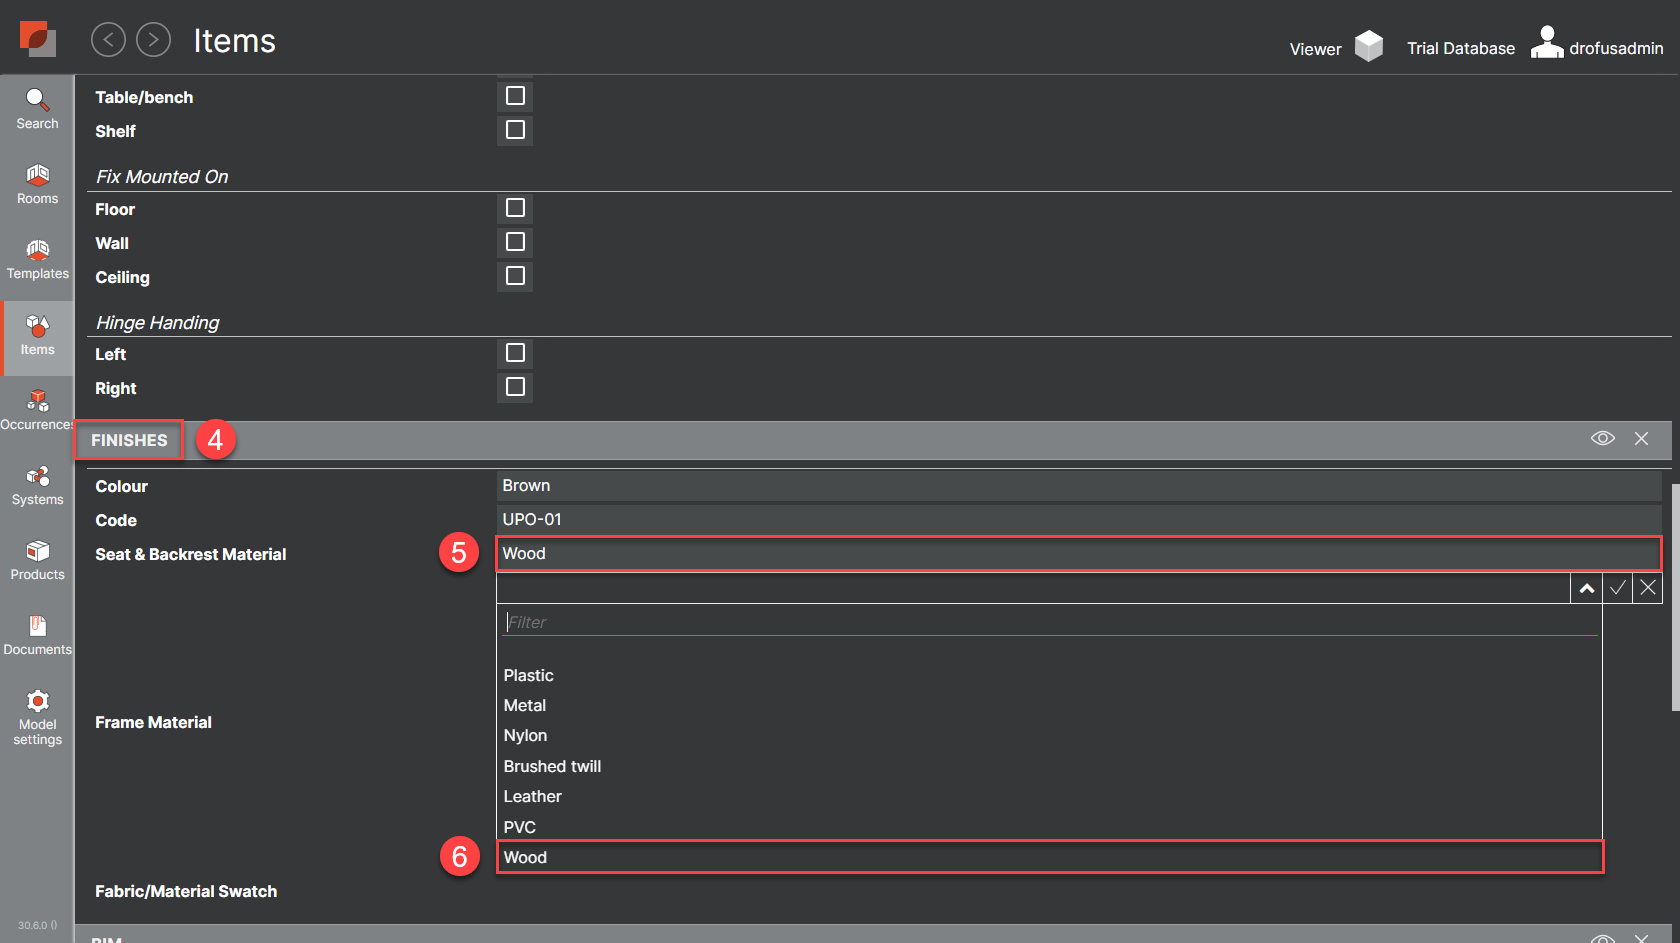
c. Select Properties, then Empty fields hidden, scroll down, and then amend some of the Specification data under “FINISHES” - (Seat and backrest Material = “Wood” and Frame Material = “Wood”) as follows:
d. Back in dRofus App - Generate the PDF Report called “Trial Item Spec” (ensuring that the highlighted selections are made in the following sequence of steps):

e. Review the PDF Report within your default Web Browser (noting the changes you had made to the Item Data (Specifications), as well as the Image you had uploaded):

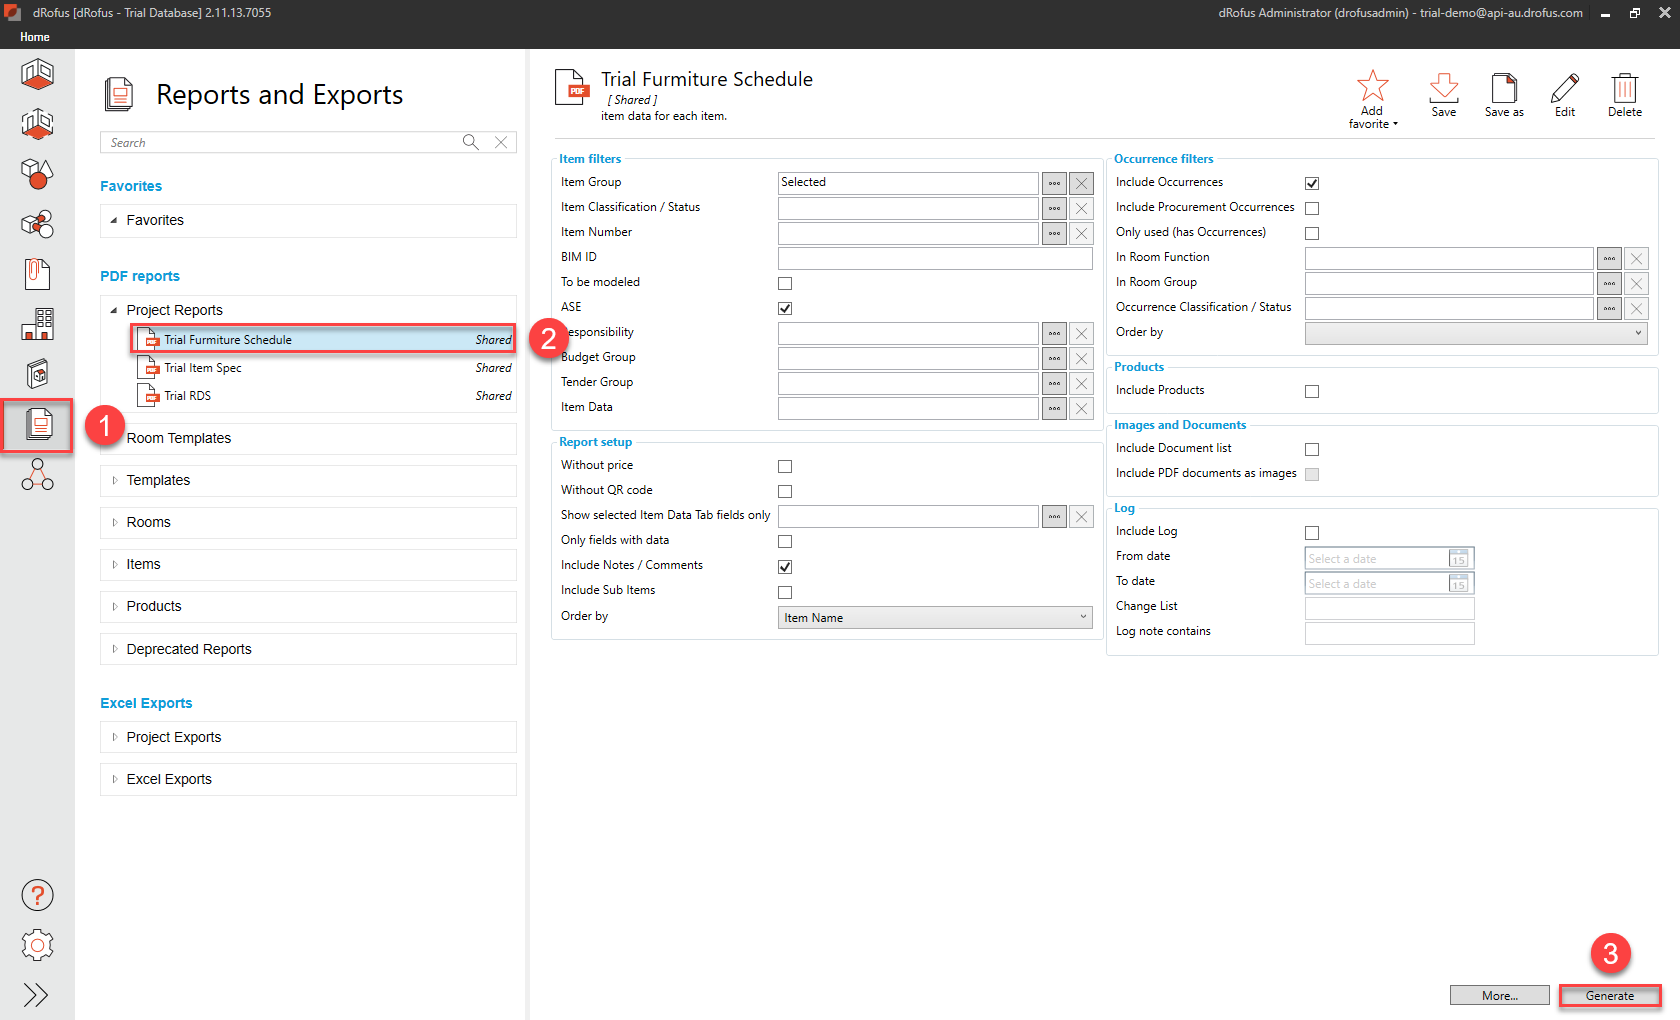
f. Generate the PDF Report called “Trial Furniture Schedule” (ensuring that the highlighted selections are made in the following sequence of steps):
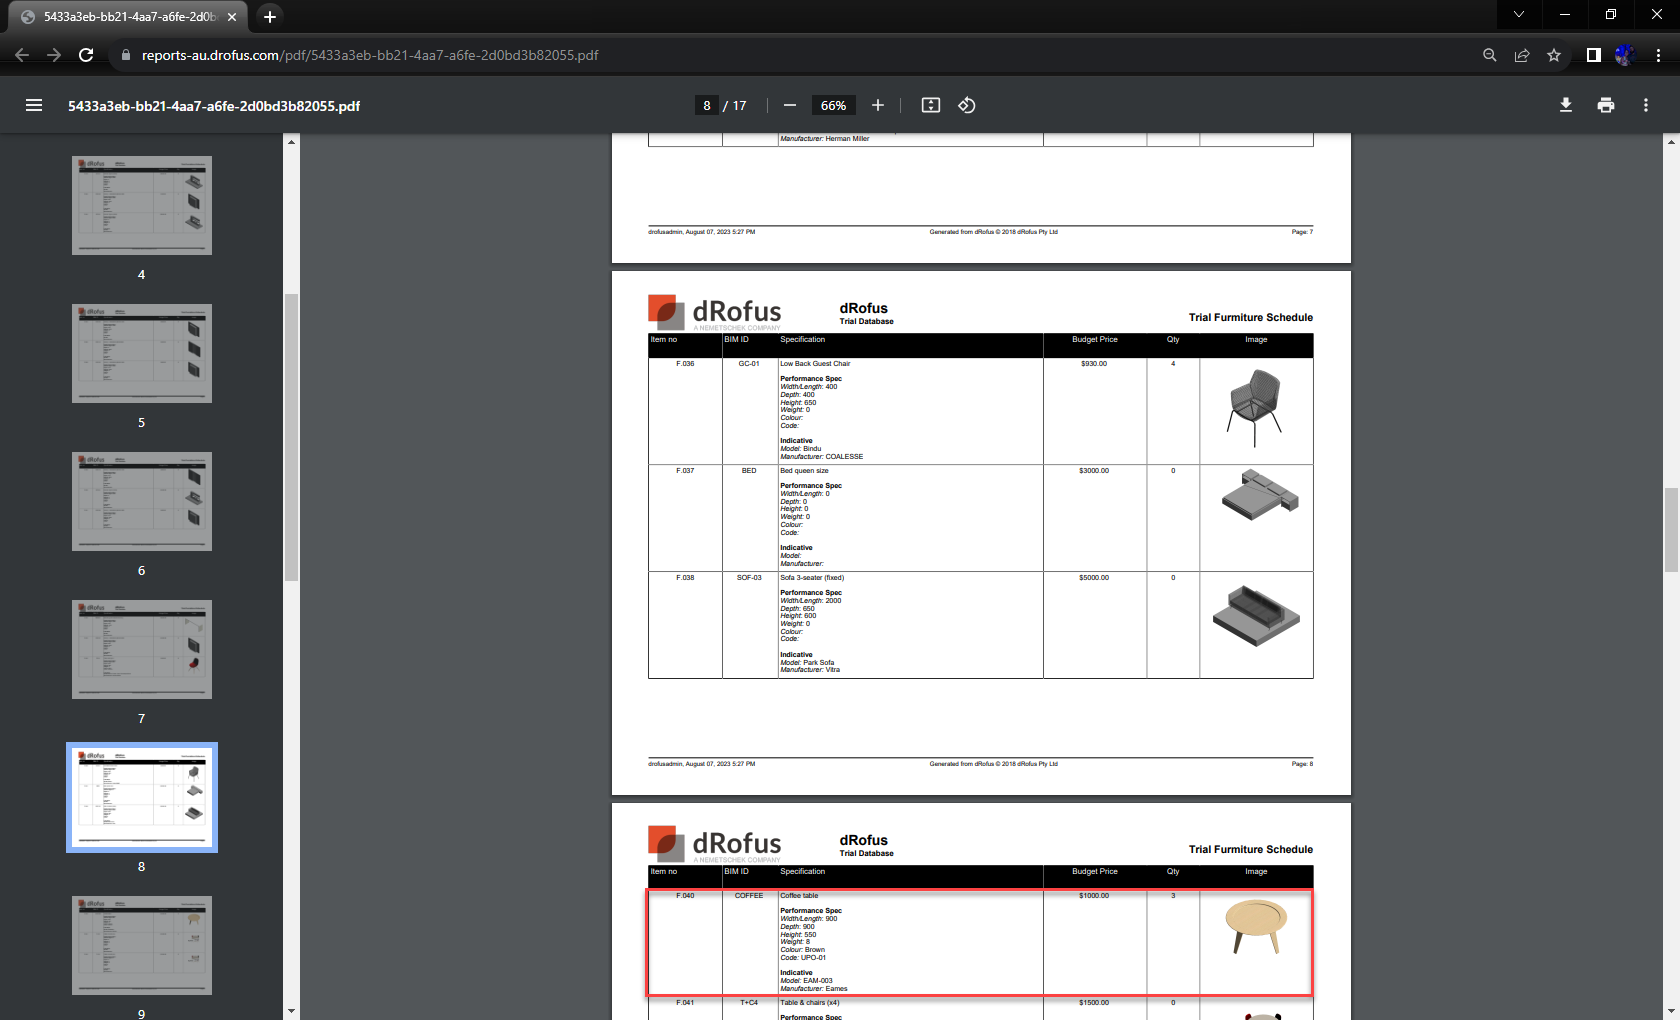
g. Review the PDF Report within your default Web Browser (especially the “Coffee table” Item):
We hope that you enjoyed exploring our software!
dRofus improves efficiency and data quality for all building types, to discuss how dRofus could benefit your project click here - https://www.drofus.com/contact